How to Connect Mailchimp to WordPress (Quick & Easy)

Are you looking for how to connect Mailchimp to WordPress? You’re are the right place. Learn how to integrate Mailchimp with WordPress in this step-by-step tutorial.
Mailchimp is one of the most popular email marketing services that allows users to build and manage different forms to collect website visitors’ email and contact information. Even though MailChimp is a famous marketing service, integrating it into a WordPress site can be challenging for new WordPress users.
This article will show you the step-by-step process of how to connect Mailchimp to WordPress. It will help you integrate MailChimp and WordPress without any confusion or frustration. So let’s dive into the article & learn everything you need in order to integrate MailChimp with your WordPress website.
What is Mailchimp?
Before starting the tutorial, let’s briefly learn what MailChimp is and what it does. MailChimp is a 360-degree versatile online marketing platform. It provides various tools to assist businesses via email marketing, marketing automation, SMS marketing, and a few other social media marketing tactics.
Not only that, but MailChimp also aids its users by providing a variety of promotional options, such as:
- Automate marketing tasks.
- Create WordPress MailChimp automated newsletters.
- Create and design forms.
- Create marketing campaigns.
- Personalizing emails.
- Reports of markings campaigns.
- Sort and manage email lists.
- Tracking email open rate and clicks.
MailChimp is not only used for email marketing but also to run SMS marketing campaigns. With MailChimp forms, you can prompt a message to visitors and get their contact information to use later for lead generation.
Suppose you are searching for a 360-degree marking platform that has a free plan and provides tons of affordable options to promote a WordPress site. In that case, MailChimp is a great option to choose and implement in your WordPress business.
How to integrate Mailchimp with WordPress
There are two ways to connect MailChimp and WordPress together,
- Integrating MailChimp using a plugin via API Key
- Implementing MailChimp using an embedded form
In this article, we will show you both methods to connect MailChimp to a WordPress site without making you stressed or creating any confusion. Also, you will find out how to start using MailChimp’s features to market your business.
Here are two methods of how to integrate MailChimp with WordPress:
How to connect Mailchimp to WordPress with a plugin
It’s a widely used mechanism. In this first method, we need to get an API key from the MailChimp site and connect via a WordPress Plugin called MC4WP.
Let’s start with the 1st method to connect MailChimp to a WordPress site:
- Go to MailChimp.
- Click on the Get Started button.

- Login or Sign up using your preferred method.

- Click on the profile avatar and select Profile.

- Go over the Extras and then select API Keys.

- Scroll download and click Create A Key button if you do not have any active API keys.

- Enter a suitable API key name and click on the Generate Key button.

- The New API Key has been generated, click on Copy To Clipboard and store it somewhere safe.

The creation of the MailChimp API Key is done. Now we need go to the WordPress dashboard and install the MailChimp MC4WP plugin to complete the MailChimp WordPress integration.
So head to your WordPress Admin Dashboard and log in with your credentials.

- After loging into your WordPress dashboard, click on Plugins and select Add New.

- Go to the search bar for and type in “MailChimp for WordPress.”
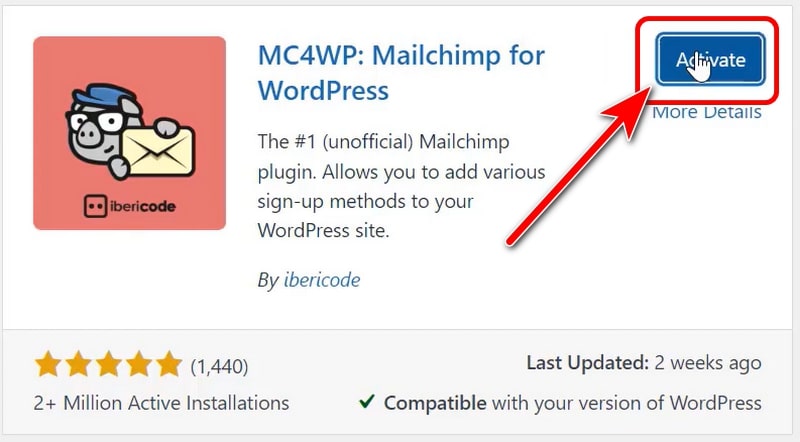
- Click Install Now for the MC4WP: Mailchimp for WordPress plugin.

It will download and finish the installation process depending on your internet speed. After that, click on the Activate button.
- Hove your mouse on MC4WP and select Mailchimp.

- The status will be shown as Not Connected. Now paste your newly created API Key in the placeholder and press the Save Changes button.


If the status says Connected, it means you have successfully connected your WordPress website to MailChimp.
Now you can use MailChimp to boost your business and increase marketing productivity.
Scroll down to see all the email contact lists and subscribers, which will be added automatically. And If you made any changes to your MailChimp list, you can make adjustments by clicking the Renew MailChimp Lists.

Click on Integration to see all of the WordPress website’s active and inactive MailChimp integrations.

That is how you integrate the MailChimp plugin into your WordPress site. In the next section, let’s learn how to use MailChimp without plugins.
👉 Learn More: How to Create a Multilingual WordPress Site (Mega Tutorial)
👉 Learn More: How to Send Mail from Localhost in WordPress (XAMPP, WAMP, ALL)
Create and display a Mailchimp form to collect users’ emails
You will need to create and display a form to collect your users’ email addresses. Let’s see how you can do that.
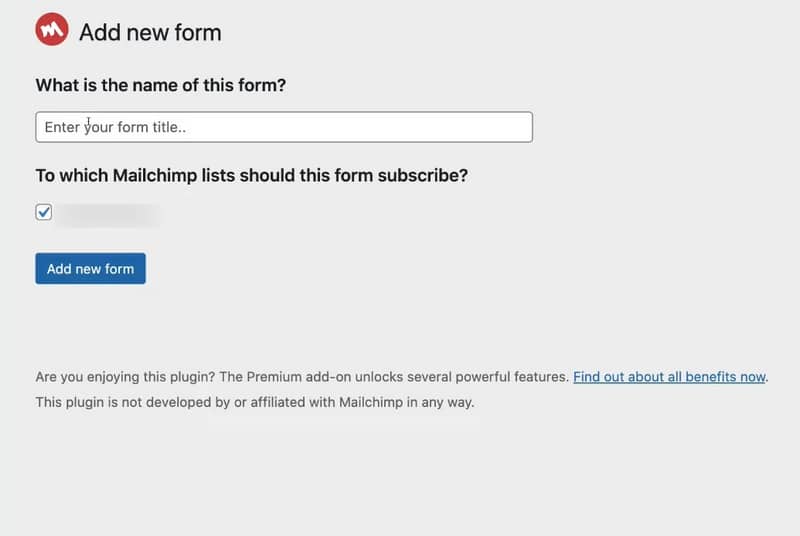
- Go to your WordPress dashboard.
- Select MC4WP > Form.
- Enter a name for the form and click on Add new form.
After creating your form, you need to customize it. You can select what kinds of information to get from the users apart from the emails.
Use the Forms Fields to select the type of information you want to collect and click on Save Changes.

You have to copy the shortcode (example: [mc4wp_form id=9]) and paste it into your block editor to display the email-collecting form inside a post, page, or a widget to collect user emails.
You can also add a Gutenberg block to your site’s sidebar/footer or wherever you want. The sidebar/footer can be a good choice because the sidebar and the footer are displayed on every page of your site. This will increase the chance of getting more email subscribers.
We will show you both methods below:
Displaying a Mailchimp form using a shortcode
- Copy your shortcode from the MC4WP > Forms page.

- Go to the location where you want to display the form on your website.
For example, we will show you how to use the shortcode on a Page.
- Go to Pages > All Pages from the WordPress dashboard.
- Click on the Edit page button.
- Paste the code in the Gutenberg editor and update the page.

Displaying a Mailchimp form using a Gutengerb block
- Search and select MailChimp for WordPress Form on the block editor.

- Select your desired form from the MAILCHIMP FOR WORDPRESS SIGN-UP FORM drop-down menu. Update the page.
And you are good to go. You have successfully added a MailChimp form to collect users’ emails.

How to connect Mailchimp to WordPress without a plugin
One great thing about the embed form is that this will be generated in HTML or Hypertext Markup Language. This gives more fluidity and flexibility to the site developers because they can copy & paste the HTML code into a Custom HTML block and display it on any page or position they want.
If you have prior knowledge of HTML and a better understanding of CSS, then embedding MailChimp is a gold mine because you will be able to design anything you want and make it more eye-catching.
Let’s learn the 2nd method of using MailChimp in WordPress:
- Login into your MailChimp account.
- Click on Audience from the left dashboard.
- Click on the Manage Audience drop-down menu.
- Select Signup Forms.

On the opened page, you will find many options such as, Create forms, Embed forms, Create Subscribers and Newsletter pop-ups, Contact forms, etc. Choose the option you want to implement on your WordPress website.

One thing you need to know is that designing the MailChimp embedded forms is simple because it has drag-and-drop features in WordPress. Like a standard WordPress post, you can add images, paragraphs, heading, placeholders, and other things to your pop-up form. Or you can choose from free MailChimp templates.
After designing your forms, click on Continue and copy the HTML code by pressing the Copy Code button.

After getting the HTML code go to your WordPress admin dashboard, and from here, you can embed the MailChimp form into different pages or sections of your website.
- Go to the Appearance and select Widgets.

- Add the Custom HTML widget block in your widget section.

- Paste the Custom HTML and save it.
- Click on Update from your widgets page to save the whole process.
And that’s how you embed your custom MailChimp forms in your sites. You can design any kind of form, such as Newsletters and more.
👉 Video: How to Connect Mailchimp with WordPress
Closing thoughts
MailChimp is an excellent service for collecting emails of website users, which comes to aid in lead generation and promoting new services and products. Integrating MailChimp to WordPress or connecting MailChimp to a WordPress site is relatively easy if done right.
Our guide about MailChimp integration has provided you with everything you need to know about integrating MailChimp to a WordPress site.
If you need any kind of further assistance with WordPress, feel free to reach us, WPGIZ is here to help you.
Disclaimer: This post may contain affiliate links and we may receive a small commission if you purchase something by following them. However, we recommend services/products that we believe good to serve your purpose.


