Sensei LMS Review – Simply Powerful

We’ve discussed several WordPress LMS plugins during the past few months. There’s another major player in this market. It’s Sensei LMS, which has been developed by Automattic, the genius minds behind WordPress.com, WooCommerce, and Jetpack.
An LMS plugin is basically a software or plugin for WordPress that you can use to build an online learning management system. You might know about some of these platforms such as Coursera, Skillshare, Udemy, LearnWorlds, and so on. With the help of an LMS plugin, you can build your own eLearning platform without having to learn coding and designing.
In today’s article, we’ll explore Sensei LMS. We want to talk about the interface, the ease of course creation, the course builder, the quiz system, certification, and more. We hope you’ll find it helpful to decide whether Sensei LMS meets your requirements. With that being said, let’s start our Sensei LMS review.
Introduction to Sensei LMS
WooThemes launched the Sensei Learning Management System in January 2013 as an LMS solution for WordPress. In 2015, Automattic (the company behind WordPress.com) acquired WooThemes that includes WooCommerce, Sensei, and more.
Sensei LMS has been designed for entrepreneurs, academics, coaches, marketers, and agencies. This basically covers all sorts of online education platforms. Individual teachers, trainers, or companies can use Sensei to create their eLearning sites.
Using Sensei LMS, you can provide training and offer certificates upon completion of the course. It can be customized to deliver education formally or casually. Currently, Sensei LMS is available in 17 different languages. You can also create questions and attach those to your lessons.
Insert media files to better reinforce your lessons. These media files include videos, slideshows, image galleries, etc. This gives your students a better grasp of the topic and makes your course much more engaging. You can also evaluate students’ grades and track their progress.
For payment collection, you can use WooCommerce payment features. You can also create diverse payment options such as one-time payments, subscriptions, or even sell memberships, the choice is yours.
Basically, Sensei LMS has all the tools necessary to build a complete eLearning site. There’s a lot of ground to cover when reviewing an LMS plugin, so we’ll break the features into segments. Let’s start with the installation.
The installation wizard
An LMS is a large and complicated piece of software with a large number of complex modules and features. When using an LMS for the first time, it could be intimidating. Some LMS plugins come with a setup wizard that helps you setup your LMS in a quick and easy way. Sensei LMS is no different.
As soon as you install Sensei LMS from your WordPress dashboard or wordpress.org, the first thing that you will see is the setup wizard. If you are a beginner or even if you are a seasoned LMS user, the setup wizard will help you set everything up quickly.

The setup consists of 4 different steps, the first page is a general welcome page, followed by the purpose page. This page asks questions to understand the purpose of your use of Sensei LMS. Depending on what options you choose, the plugin will make the relevant features available.
You can choose multiple options on this screen. You can come back and change these settings later. So don’t worry, just pick and continue.

The 3rd phase of the setup wizard opens up the features page. This is of course not all the features but some of the important features. The WooCommerce paid courses and Sensei LMS content drip are paid products that cost $129 and $29 per year respectively.
But the other 3 features: Sensei LMS certificates, Sensei LMS course progression, Sensei LMS Media attachments are free to use. So the optional features that will be available are:
- The WooCommerce Paid Courses – $129 per year
- Sensei LMS Content Drip – $29 per year
- Sensei LMS Certificates – Free
- Sensei LMS Course Progression – Free
- Sensei LMS Media Attachments – Free

In the final phase of the setup wizard, you may provide your email address to keep updated with the latest news and tips about Sensei LMS.
Sensei LMS dashboard
Before diving into the course builder, let’s look at our WordPress dashboard and what Sensei LMS has added to it.

As soon as we select Sensei LMS, the first thing we see is the courses page. The courses page looks like a typical WordPress post section. On the top, instead of ‘Add New’ we see 3 options. These options are
New Course: Opens up the course builder where you can build a course. That course will be added to your courses page.
Order Courses: You can choose this option to rearrange the order of how your courses are displayed. Obviously, if you have no courses, you cannot use this option.
Course Settings: This button will take you to the course settings page. This section can also be accessed from the Settings > Courses.

Course settings will have a default setup, but if you want to change something, such as course image width, course archive pagination, etc. you can do it from here.
The Sensei LMS dashboard options are mainly divided into 3 sections. The 1st section is all about courses. It consists of the following options:
- Courses: As we have already seen, this is the part where all your courses are stored. You can customize the courses, re-arrange their order, or import quizzes via CSV files.
- Modules: A module is a collection of lessons that you add to your course. A module conceptionally exists as an additional layer between courses and lessons.
- Lessons: The lessons that you create are located in this page. It is basically like the courses page. Sensei LMS has a great lesson builder as well. We will explore it deeply in the later part of this article.
- Questions: By the title, you might have already understood what this section is all about. Yes, all the quizzes you have created are stored here. You can also create quizzes from this section and add those later when you are building your lessons or courses.
That covers the 1st section. The 2nd section deals with student management and grading. Let’s take a look at what options it has:
- Student Management: The student management section is where you will find all your registered students.
- Grading: This is the part where you can grade your students. You can filter the students using the ungraded, graded, in progress, and all tab located in the top.
- Messages: Your registered students will have the option to contact the course teacher via private messages. This is where all the messages are stored.
For the 3rd and final section, we have the analytics and general settings options. Let’s take a look at what options are available here:
- Analysis: You can find how many students enrolled for a course, total lessons, average courses per student, average grade, etc. here.
- Settings: As the name suggests, this is the settings section. The setup wizard already took care of the settings for you according to your selections. You can still come here and find the general, courses, lessons, email notifications, student profiles, and certificate settings.
- Tools: This part contains a number of tools you can use. For example, if you want to import/export courses, you can do it from this section. There are various other tools as well.

Extensions: On the 2nd page of the setup wizard, we already selected the extensions we will need. But if you want to get other extensions, you can do it from here.

The Sensei dashboard interface is what you generally would expect from an LMS plugin. It does look very clean and has a good navigation system. If you selected the Certification option during the installation process, then you will find the Certificates menu on your dashboard. We will explore it more deeply later on in this article, but for now, let’s move on and discuss the course builder.
👉 Learn More: How To Create a Course With Sensei LMS (Step-by-Step Tutorial)
Module and lesson builder
Before discussing the course builder, we need to talk about the module and lesson builders of Sensei LMS. The course builder of Sensei LMS is a bit different than the other LMS plugins we reviewed. You can think of the modules and lessons as small pieces of a puzzle. In the course builder, you put those puzzle pieces to create a whole new course.
It might seem a bit tedious at first, but that’s not the case. Using this method we felt that it was actually a practical approach. But it’s just a bit different than the other popular LMS plugins.
Modules
In Sensei LMS a module is a collection of lessons. Think of modules as a chapter of a book. It will consist of various sections and sub-sections. Before you move onto the course builder, you need to create modules and then create lessons to put within those modules.

Your created modules will appear in the modules section of Sensei LMS. Before creating modules, plan your curriculum. It will help you create modules and the overall course.
Lessons
This is the section that feels more like the course builders we are used to (Tutor LMS, LearnDash, Lifter LMS, etc.). You can name your lesson, mention the difficulty level, display estimated time to complete the lesson, put in texts, images or video contents, add quiz, etc.

The lesson builder also has the quiz builder inside it. You can use that to create a quiz for any particular lesson. You can also select the quiz builder from the dashboard and then add those quiz to the relevant lessons.
Overall, this is the section where your course takes an actual shape. There’s a lot you can do from the lesson builder, but we are mentioning just a few things:
- Give a name to the lesson
- Set a featured image for the lesson
- Set difficulty level of the course
- Put in contents
- Add media files (images, videos, etc.)
- Add quizzes
- Connect the lesson to a module
Once a lesson has been created, it can be connected with a module. This can be done before starting to build the lesson.
Quiz builder
Previously we mentioned that a quiz builder is included in the lesson builder itself. But you can also access the quiz builder from the dashboard too. This is especially helpful if a question paper is already prepared and you just want to create all the questions for the course.
In the earlier version of Sensei, there was a separate interface for the quiz builder. But in the newer version, you can now utilize the power of Gutenberg. Now it has an intuitive interface where you can build and customize your quiz. There are 6 quiz categories/types to select from:
- Multiple Choice
- True or False
- Gap Fill
- Single Line
- Multi-Line
- File Upload

Depending on what quiz category you choose, the block will change. The block will automatically set up according to the category you’ve selected. For example, if you select the multiple choice category, the block will give you a quiz title, ability to add options, ability to choose the correct option, etc.
If you are wondering what the interface of the quiz builder looks like, then take a look at the screenshot below.

There are options to duplicate and import/export the quiz. For import/export, the file will be CSV.
Course builder
The course builder is one of the most important aspects of an LMS. This is where you can create your courses, add quizzes, certificates, etc. There are tons of different things that you can do with the builder to make your course more engaging.

This is the part of the LMS where you can name your course, add lessons to it, add quizzes, insert media files like audios, videos, images, etc.
For this demonstration, we are using the default Twenty Twenty-Two theme. If you are using a different theme, the course builder might look a bit different. But the builder itself is pretty straightforward. If you have modules created for the course, you can connect those to your course from here. You can also create a course and then create your modules. After that you can connect the modules from the modules builder.
You can take a look at the preview to see how your course looks. So, that is how the course builder of Sensei LMS works. You create modules, lessons, quizzes and then add those to your course to complete it. On the default theme, a course should look like the following:

For a better frontend style, we recommend using a good educational theme for your LMS website
Speaking of themes, Sensei LMS recently added a new theme for better learning experience. This is known as the Learning mode and it can be activated from the Sensei LMS settings options.
The Learning mode
The learning mode is a newly added feature that is also called course theme because of how to change the design of the frontend. It is also a part of the course builder. This basically eliminates the unnecessary distractions so that students can concentrate on the task at hand.

The learning mode changes the frontend so much that it looks like a new theme has been applied. By default, there will be a side course navigation panel. The students can contact the teacher, take the quiz and go through the course.
Another amazing thing about the learning mode is that it is compatible with the Full Site Editing that was introduced to WordPress recently. Although, currently, the FSE (Full Site Editing) is in beta phase, so we would recommend not using it for now on a production site. But it is refreshing to know that Sensei LMS is updated with the latest technologies and trends.
Certificate builder
Certificates are an important part of a course. When your students complete a course, they expect some certification as a proof of their accomplishments. For a good LMS plugin, a certificate builder is a must. Fortunately, Sensei LMS gives you a few options for certificate building.
Sensei LMS Certificates is a separate plugin that you probably have already installed through the setup wizard. If not, then you can install it for free from the extensions menu.

Once the certificate builder extension is installed, It will appear in the WordPress dashboard menu.
The certificate builder allows you to create your custom certificate. You can also use a template provided by the developers.
The certificate builder of Sensei LMS is a bit similar to the one we saw in LearnDash. You have to use a blank canvas to put all your contents inside it. For the design, you have to make your own in Photoshop, Illustrator or any other applications. Then upload these and put in your contents.
A unique feature of the Sensei LMS certificate builder is that you can drag and drop your contents. First, you have to put in your contents, and then you will have some square boxes on the canvas. These square boxes illustrate how much space your contents will be taking on the certificate.

There is a certificate data area where you can insert the data and customize the font, color, position, add a border, bold or italic etc.
To display the certificate you have just created, click on the preview button. You might see a page saying that the example template is private. If that is the case, you have to complete your course and then download the certificate manually. In our post on Tutor LMS vs LearnDash, we found that LearnDash uses a similar strategy in previewing certificates.

If you want to use your own certificate background, then consider the following recommended settings for the image:
- Supported image formats: PNG, JPG
- Recommended image resolution: 1200 x 675px – higher resolutions will work, but they will be scaled down and will lose quality.
- Recommended image DPI: 72 – higher DPIs will work, but they will be scaled down and will lose quality.
Student management
As your courses grow in popularity, so does the number of students. In a good LMS plugin there should be sufficient options to manage your students. Sensei Learning Management System has some really great ways for managing students. You can access the student management system from WordPress dashboard > Student Management.

You can find the number of students on this page. Names of the students, enrollment status, course status, course enrollment date, course completion date, and other student data are also available. You can add students to a course manually from the box below. Just type the name of the students (you can find the student name from Users on the WP dashboard), and then click Add to _____ (name of the course).
Student grading
You can also grade students manually. Just go to grading from the WordPress dashboard.

You can find all the students who took your course and their status on each lesson. The students will be graded automatically or you can do it manually. Just select ‘Review Grade’ to see how a student performed on the questions.

You can also send in an ‘Answer Feedback’ to convey your students some informative messages. There is an option to reset the quiz result. You can use this if your student has answered incorrectly and you want to give them another shot at taking the quiz. Combine this reset option with the answer feedback to give your students the best learning experience.
Student messaging
The messaging between an instructor and students is an important factor in getting the best out of a course. Sensei LMS provides a great method of communication between the students and instructors. The student can seek help or just casually say hi through this feature. The teacher can also do special counseling to the student. In the ‘Messages’ option, one can find all the messages from their students.
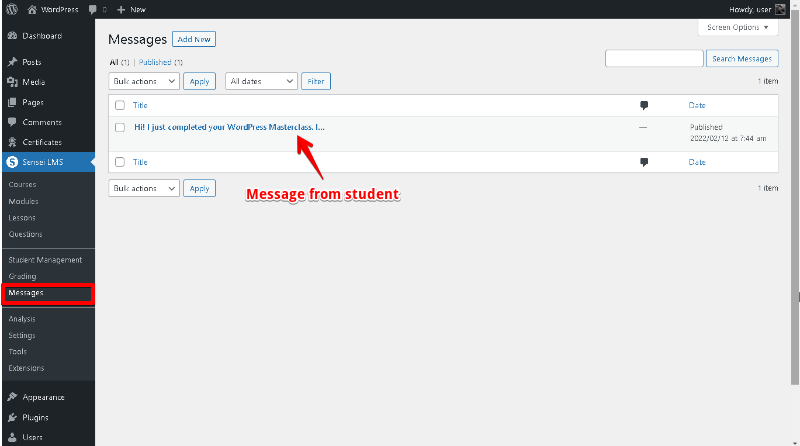
You will find all the messages from your students on this screen. You can view, edit and reply to these messages from here. It’s very easy, simply hover your mouse over the comment you want to respond to and then click on ‘View’. Then under ‘Leave a Reply’ post your own response.
Pricing

You can create and teach free courses in the basic version of Sensei LMS. But to take your online education website to another level, you can upgrade to Sensei Pro. There are two plans for the paid version of Sensei:
- Sensei Pro – $15/month (billed $179 yearly)
- Sensei Bundle – $34/month (billed $399 yearly)
Statistics and analytics
To see how your LMS website is doing, you can look at the analysis from your dashboard. You can find a lot of information from this tab. You can have a look at the overall statistics of your website and the stats of your enrolled students as well.

You can find the total number of live courses on your site, the total number of lessons, the total number of students, average grade, the total number of completed courses, etc. You can find the statistics of the enrolled students on your website and also download the stats in a CSV file.
The analytics system of Sensei LMS is very plain and simple. So far, with all the LMS plugins we reviewed, we found that Tutor LMS has the most comprehensive report and statistics panel. Compared to other LMS plugins, we felt that Sensei LMS analytics provides little data. But still, you can use this data to make informed decisions.
Summing up
So, that concludes our Sensei LMS review. As many of you know, reviewing an entire LMS plugin is such hard work and Sensei LMS is not a small plugin. But we’ve tried our best to bring you the most authentic and honest review. For this, we went through the course creation process, lesson building, quiz creation, and so much more. So you can go through the entire journey and find out if Sensei LMS is indeed the plugin for your online learning site.
We have used the free version to create the course. Using a more sophisticated theme and premium extensions, the entire experience can be improved. If you found our article on Sensei LMS helpful, leave a comment and let us know your thoughts. Let us know which LMS plugin you use and why. We would love to hear from you.
Disclaimer: This post may contain affiliate links and we may receive a small commission if you purchase something by following them. However, we recommend services/products that we believe good to serve your purpose.


