How to Add Cookies Popup in WordPress – Best, Easiest Ways

In this post, we’re going to see how to add cookies popup in WordPress using a plugin and a page builder. You can use either one to do it.
A cookie consent popup is a message that pops up when you visit a site asking you to approve/evaluate the site’s cookie policy. Usually, this message doesn’t go away and sticks to the browser window until you approve of it. In this post, we’re going to learn how to add a cookies popup in WordPress.
Today if you want to build a site and store cookies on the visitor’s browser, then you must show a popup message to the user. The European Union law requires websites to inform visitors that they are storing cookies and get the visitor’s consent. Why do you need to store cookies, why display the cookie popup, and how to add cookies popup in WordPress, we will discuss all that in this post today.
What is a Cookies Popup and why use it?
Before knowing how to add cookie banner to WordPress website, let’s discuss what a cookie is! Cookies are small files stored on your browser which are sent from a website. These cookies are stored for various purposes such as keeping track of user’s actions on the website. Again, WordPress uses cookies by default for authentication purposes to store session information for logged-in users. It also uses cookies when a comment is made on the site.
Besides these, other WordPress plugins might use cookies to store different information or recognize repeat visitors and provide many benefits that enhance a visitor’s experience. So cookies can be useful for the following purposes:
- Improving the user experience by recognizing repeat users, and recalling their usernames and passwords
- Displaying relevant and targeting ads based on browsing history
- On eCommerce websites, by tracking previously viewed items, shopping preferences, engagements, and behavior on site, visitors can be shown items that they prefer shopping.
So using cookies can have many benefits. Now let’s talk a little about how browsers and servers respond to each other.
Visiting a website from your browser might look like a simple task but there’s a lot going on in the backend when you’re doing so. There are a series of intercommunication taking place between the server and the browser when you’re visiting a website. When you enter a website, your browser will request some information from the server where the website is hosted. The server will ask for some other information from your browser as well. Once the information is exchanged, your browser will be able to display the website.
Cookies can be a good way to enhance the user’s experience on a website. But since these collect a visitor’s information, it could also have a negative impact. For example, this user information might be shared with a third-party advertising platform which is something that you might not want.
For this reason, websites displayed in Europe and a few other regions must inform visitors about their cookie usage. If your website targets an audience of those regions, you must show a cookie consent disclaimer. Otherwise, legal steps could be taken against the website.
How to add cookie consent banner in WordPress
You can add cookie consent popups to your WordPress site using several methods. One of the quickest and best methods is to use a WordPress Cookie consent plugin. You can also use the Gutenberg to add the cookie popup. Although that requires a lot of customization, still it’s possible to add the cookie consent popup using the default page builder of WordPress.
If you’re using other page builders, those might also have cookie consent blocks or elements. For example, Elementor gives you a cookie consent element to display the popup on your WordPress website. We will show you two methods through which you can display cookies popup in your WordPress website.
Method 1: How to add cookies popup in WordPress using plugins
For our first method, we will take a look at how to add Cookies popup in WordPress using plugins. There are several WordPress cookie plugins you can use for this purpose. In our demonstration, we will use CookieYes. CookieYes is a GDPR-compliant plugin and is very popular.
First, install and activate the CookieYes plugin by CookieYes. The plugin has 1+ million active installations and has very high ratings on WordPress.org.

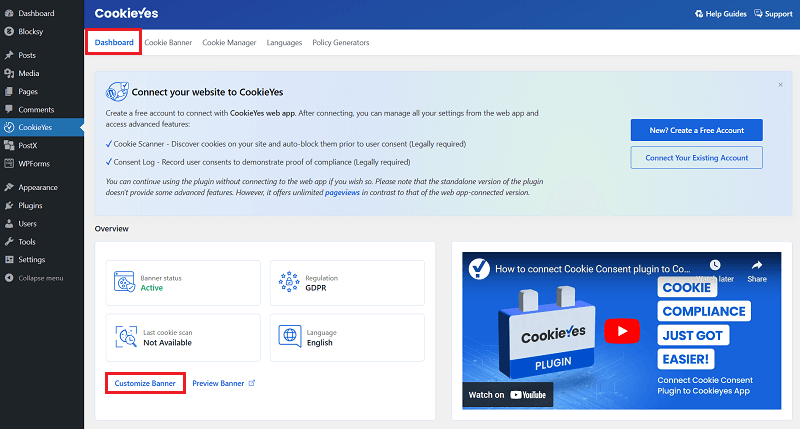
The plugin will be added to your WordPress dashboard menu. If you click on it it will take you to the CookieYes dashboard. Under the ‘Banner Status’ if you see ‘Active’ that means your Cookie popup is already enabled. But if you want to further customize the popup, you can click on the “Customize Banner” button.
This will take you to the ‘Cookie Banner’ tab. Here you can edit the text, customize the color, choose the position where the message will be displayed, and do other stuff. The Cookie Banner tab has 4 options to help you customize your Cookie popup. The first one is the General. Here you can Geo-target where your banner will be displayed. With the free version, you can only choose Worldwide. To specifically select EU Countries & UK, and countries of your choice, you need the pro version of the plugin.

If you select the ‘Show advanced settings‘ link, you will see other options. Here you can specify when the consent will expire, should your page reloads upon accepting the cookie consent, etc. You can also click on the Banner Preview toggler on top. This will show you what the cookie consent popup looks like. We suggest you turn this on as it will help you with the design.
👉 Get CookieYes (All Features)
Next, click on the Layout tab on the left side menu. Here you can choose the position and style of how your consent popup is displayed. If you have the ‘Banner Preview’ enabled, you will be able to see the popup change instantly.

The next tab is ‘Content & Color’ where you can edit the contents of the consent popup message. You can also customize the colors of the buttons, texts, popup background, etc. You can choose the label, put in links to the buttons, include a close button, put in a custom logo (only in premium), reject all buttons, etc.

There’s also an option to choose your color scheme for light dark and custom. If you quickly want to change your cookie consent color scheme, you can select one from here. If you want to put in your link to the Cookie Policy, you can enable the “Cookie Policy” button and paste your page link from this section.
There are many more options to explore such as the preference center, cookie list, revisit consent button, etc.
Your visitors will also be able to customize their cookie options. To add different cookies, click on the ‘Cookie Manager’ tab on the top. Here you’ll find different types of cookies. The following cookies are available:
- Necessary
- Functional
- Analytics
- Performance
- Advertisement

You can click on any of these cookies than on the center, you can click on the “+ Add Cookie” button to add a Cookie of that specific type. All you have to do is add your Cookie ID, domain duration, and description. You can also edit the cookie details by clicking on the pencil icon. You can also generate Policy pages by clicking on the “Policy Generators” tab.

Now if you visit your site, you should see the Cookie consent popup message. And that is how to add Cookies popup in WordPress using the CookieYes plugin.
👉 Get CookieYes (All Features)
👉 Video: How to Add Cookie Popup in WordPress
Method 2: How to add cookies popup in WordPress using Elementor
If you don’t want to use a plugin to display cookies popup, you can also use a page builder like Elementor to do it. Although different page builders offer different cookie popup features, some page builders on the other hand don’t give you that feature. It might be possible to create a popup using a page builder that doesn’t have any cookie popup block or element, but that will require a lot of customization.
Elementor being one of the most popular page builders for WordPress offers some really great cookie popup features. For this reason, we’re going to show you how to add a cookies popup in WordPress using Elementor. However, do keep in mind that the cookie popup feature is only available in Elementor Pro.
To quickly create a popup, click Ctrl+E to bring up the Finder in Elementor, then type ‘add new popup’ and select the option. This will open up the Elementor builder and will take you to the popup template library. From here you can select what kind of popup you want from the category drop-down menu on the top left corner. These are the categories you can select:
- Bottom bar
- Classic
- Fly-in
- Fullscreen
- Hello Bar
- Slide-In

Select the style of the category you prefer, we’re selecting the bottom bar to display our cookie popup. Now you can design your cookie popup using Elementor.

After your design is complete, click on the settings icon in the bottom left corner of the screen. This will open up the popup settings. In the general settings, you can select features like screen overlay when the cookie popup shows.

Next, select the advanced tab from the top. Here you can choose advanced settings for your cookies popup. You can prevent users from scrolling and closing your cookies popup menu.

Now you can publish this page. But let’s look at the conditions and triggers first. Click on the ‘Up Arrow’ beside the Publish button and select the ‘Display Conditions’ option. Now, from the conditions tab click on the ‘Add Condition’ button to add some conditions. First, we’re going to include the cookie popup for the entire site. Second, we’re going to exclude the popup for our Terms of Use page.

You can setup your conditions according to your needs. Next, click on the Triggers tab from the left side menu. From here you can select your preferred triggers, we selected the on-page load trigger. After that, you can explore other options if you want, but we have one more thing to do.
We didn’t add the button function. To do that, simply select the ‘Accept All’ button and click on the ‘Dynamic Tag’ icon beside the link and select the popup. Now you’ll see a wrench icon beside Popup. Click on it and select the Close Popup under Action.

Now for the decline button, select it and paste it into the link of your Terms of Use page. If you would like to take a different action, you can explore other options of Elementor. But for now, this simple Cookie popup is now ready. Now if we visit our site, we can see our simple Cookie popup. And that is how to add a cookies popup in WordPress using an Elementor.
Conclusion
Today many websites display the Cookie popup message to let the users know of their cookie usage. Although these cookies can be used to enhance your performance and user experience, they can also be used negatively. For this reason, if you target the visitors of the EU and some other countries, you’re required to display the cookie usage policy.
So that is how to add a cookies popup in WordPress. It might be a bit complicated to create your own cookie popup using page builders, but it’s still not that difficult. But it’s best to use a WordPress cookie plugin like CookieYes. Some themes also provide you the option to display the cookie consent popup. For example, in Blocksy, there’s an option to display the cookie consent. So if you’re using a good theme, see if it has the option to display the cookie consent popup.
Disclaimer: This post may contain affiliate links and we may receive a small commission if you purchase something by following them. However, we recommend services/products that we believe good to serve your purpose.


