How to Create a Udemy Clone with WordPress

Do you want to create an LMS website like Udemy? With the help of some amazing themes and plugins, it’s possible to create a Udemy clone with WordPress. Now you can have your own LMS marketplace like Udemy.
LMS or Learning Management System websites are becoming very popular these days as more and more people prefer learning online. During the frequent and long lockdowns due to the pandemic, many stayed indoors and learned new skills online. Websites like Udemy were very helpful as people could learn and also get certified online.
The LMS industry today is a smart investment as the demand for online courses is on the rise. More instructors and industry experts are keen on sharing their knowledge and experience with others. And online courses are the best way to do it. With the help of WordPress, you can easily create an LMS marketplace like Udemy.
In this post, we will go through all the steps you need in order to create a Udemy Clone with WordPress. If you’re interested, we’ve also made a video on YouTube on How to Create Udemy Like Website with WordPress. You could check it out.
So let’s start this article.
Requirements
Before we start building our LMS website we need to know what we will be needing in order to complete this project.
Domain & Hosting
Since this is a website, it must have a domain name and a place to store all the files. A domain name is the name or address of your website. This is how your website can be identified through the internet.
You can use many for registering a domain name such as Namecheap, NameSilo, GoDaddy, Name, etc. Namecheap is a popular choice for registering a domain name. It offers the .com for only $5.98. It also has a rating of 4.7 out of 5 stars by over 2 million customers. Popular brands such as Figma, imgur, Buffer, etc. are Namecheap’s valued customers.

You can also try GoDaddy as it has 20+ million customers worldwide. They provide efficient customer service and the website design is very intuitive. You can easily manage your domain and files. So GoDaddy isn’t a bad choice either.
But what we would like to recommend is going with HostGator. It offers you great speed, stability, performance, and security at a decent price. Some of the perks of choosing HostGator are:
- One-click WordPress Installer
- Unmetered bandwidth
- Free SSL certificate
- Free domain included (for 1 year)

As you can see, one of the perks of going with HostGator is that you will have a free domain for one whole year. Which is a big plus point. You will also get an SSL certificate which is crucial for any website.
Therefore, we recommend choosing HostGator as it doesn’t only give you amazing performance, but you also get all of these features at a really cheap price.
👉 Get HostGator Domain+Hosting (SALE)
WordPress
Well, this is obvious. We need WordPress to build our entire website. As you all know, WordPress is the most popular CMS in the world. If you compare WordPress with other CMS or website building platforms, WordPress holds 43.7% of the market share beating other platforms like Joomla, Squarespace, Drupal, Wix, etc.
So WordPress is the best choice for building your LMS website. Also, the plugin and theme we’ll be using are built for WordPress. So this is the heart of all the development.
Tutor LMS
There are several LMS plugins in the market such as LearnDash, LearnPress, Sensei LMS, and so much more. All these plugins are filled with powerful features and are undoubtedly a great choice for building your LMS website. But for this tutorial, we are going to use Tutor LMS Pro.
Tutor LMS is an all-in-one WordPress LMS plugin that not only lets you build courses in the free version but also allows you to sell paid courses as well. This feature is rarely seen on any free LMS plugins. But to make a Udemy clone, the free version won’t be enough. You need all the pro features of Tutor LMS. Now in our other posts, we’ve done Tutor LMS vs LearnDash, Tutor LMS vs LearnPress, and Tutor LMS vs LifterLMS where we made some really great comparisons. You could check that out if you want.
But Tutor LMS Pro has some really great addons and powerful features that are a must for a Udemy level website. While there are way too many features to mention, let me mention only some of those:
- Multi-Instructor Website
- Notifications for Instructors and students
- Email notifications
- Editable email templates
- 10 quiz categories
- Multiple certificate templates for courses
- Announcements
- Q&A Forum
- Content Drip
- WooCommerce, EDD (Easy Digital Downloads),Restrict Content Pro, and Paid Membership Pro
- Easy integration with Elementor, Divi Builder, BuddyPress
👉 Get Tutor LMS Pro NOW ✅
📌🔥 BREAKING: Tutor LMS Lifetime License Plan Available 🎉🔥
These features will help you build the perfect LMS website you’re looking for. Tutor LMS also has a very beginner-friendly approach to course creation. So even if you have no coding knowledge, you can still create and sell courses. You can also manage your entire website with the given features.
Skillate Theme
Since we are building a website with WordPress, we need a theme. In order to make our job a lot easier, we’ve selected Skillate theme developed by Themeum. Themeum is the company that developed Tutor LMS. They have created Skillate for those who want to build a professional LMS website easily and quickly.
The theme has so many great features that you’ll fall in love with. Let’s start with some of the basic features:
- Fully responsive design ready for mobile/tablet experience
- Robust & user-friendly LMS features
- Multi-instructor ready
- Modern search and navigations
- 3 homepage variations included
That’s not all, the theme has all the LMS features already setup for you to use. Instructors can register on your site and will have their own dashboard. They can customize their own profile using this dashboard. So, after you import your demo, most of your LMS functions will be available. We just have to create some courses and tweak some options and you will be posting courses and earning money in no time!
Extra plugins
There are a couple of more plugins that we need for this project (other than Tutor LMS) but these are automatically installed when you install Skillate. Initially you might not need it but as you start building and selling courses these become very important. These plugins are:
- Qubely: A Gutenberg block plugin from Themeum
- WooCommerce: eCommerce toolkit for selling your courses
- GamiPress: For creating the gamification system for WordPress
- Mailchimp for WordPress: For creating various signup methods
- Paid Memberships Pro: A member management and member subscription plugin
You’ll find that all you need for your LMS website is included in the Skillate installation. For customizing your web design, you can use Qubely. For selling your courses, there’s WooCommerce, for gamifying your courses, you can use GamiPress, for managing your members or instructors you can use paid memberships pro.
You can also use alternative plugins if you want, but we recommend using these plugins which are already set up on your theme. But if you are comfortable with other plugins you can do so, but you have to manually set those up. For example, you can use Elementor instead of Qubely if you want but you have to redo some of the designs.
HostGator – Get the best domain and hosting for your LMS website

If you don’t have a domain and hosting plan then getting it from HostGator is a great choice. HostGator gives you a free domain for one whole year and a free SSL certificate. So you can save a lot on domain and SSL.
Getting a domain and hosting
To get your domain and hosting, simply head over to hostgator.com and click on the “Get started” button to see the plans. There are 3 plans, the Hatching, Baby, and the Business plan. Of the 3 options, the Baby plan seems to be the best one, but if you have the budget, you should get the Business plan. The Business plan gives you a ton of features that you’ll not get in the Baby plan such as
- Free dedicated IP
- Free SEO tools
- Free upgrade to positive SSL and
- Cloudflare CDN with up to 2.5 times faster page load speed.
Some of the features of the Business plan are really great if you are looking to build a Udemy clone. But if you don’t have the budget, you can go with the Baby plan and upgrade to the Business plan later on down the line.
👉 Get HostGator Domain+Hosting (SALE) ✂️
Connecting Domain and Hosting
After you’ve completed your purchase, you’ll receive an email from HostGator shortly. In that email, you will receive all your credentials. You will receive a link to your control panel and you will receive your username, domain, password, nameservers, and server IP.

Now there are a couple of ways to install WordPress on your server but before that, let’s understand what you should do if you have registered your domain from some other services. For example, if you have registered your domain from GoDaddy (or any other services), you need to point your domain name to the nameservers of HostGator.

To do this, go to your GoDaddy account (or the service which you used to register your domain) and go to your DNS Management and Domains. Now copy the nameservers from HostGator’s email and then go back to the DNS management page and paste those nameservers.
Setting up WordPress
Now that your domain is connected with your server, its now time to install WordPress. There are a few ways through which you can do this. We are mentioning two of the easiest methods of installing WordPress below:
First Method: Through HostGator Dashboard
The first step is through the HostGator dashboard. From your HostGator dashboard, find “Install WordPress” option under Control Panel and click on it. This will launch the WordPress installer

Second Method: Through cPanel
You can also install WordPress using the Softaculous app installer from your cPanel. From your WordPress dashboard, click on “Launch cPanel” it will take you to the cPanel login screen.

Just enter your username and password (found in HostGator’s email) and you’ll see your cPanel. You can use the cPanel to do a lot of things like create and manage your emails, create FTP accounts, access your WordPress files, setup WordPress, Joomla, etc. For now, you don’t have to worry about all these options.
On the Popular Links section, you can see the WordPress logo that says “WordPress Installer”, you can click on it and it will launch your WordPress installer.

Third Method: Through Softaculous Apps Installer
Another method is through using the Softaculous Apps Installer found in cPanel. From the cPanel, scroll down and you’ll find the Soctaculous Apps Installer. This option is also located in the left navigation panel.

Using the Softaculous program, you can install other applications as well. This is the most common way WordPress is generally installed.
No matter which method you choose, the WordPress installer is more or less the same. An interface will open up. From here click on “Install Now” and it will bring up another page where you can provide your website name, description, admin name, password, email, etc.

By default, the username will be ‘admin’, ‘user’ or something generic. Make sure you choose a good username for your WordPress website. Also choose a strong password that contains a combination of lowercase and uppercase characters, symbols, numbers, etc. This step is very important because hackers target WordPress websites frequently and websites with poor credentials are at risk. So don’t let your WordPress site get hacked.
The next step will give you the option to choose a language and manage plugins. Simply select your language and no need to do anything for the plugins right now.
In the next part you will find the advanced option where you can setup the database of your website. For now, ignore this and move on to the next step.
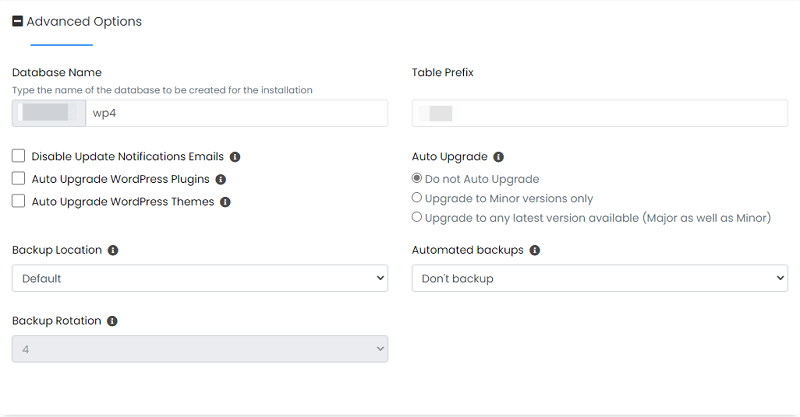
The next part is to choose a theme for your website. When you’re creating a website using WordPress, you just need a theme. Don’t spend too much time here, simply go with the default theme (Twenty-Twenty-Two Theme) and hit Install.

It will take some time for the WordPress installation to be completed. After it is completed, you can visit the link on your website to check it out.
Type your domain name on the URL bar of your browser and you’ll see your WordPress website. If you don’t see your website, then you have to wait for a few minutes. Sometimes it takes time for the domain to be connected with your hosting. This might be the case if you’re using the domain from another service like Namecheap, GoDaddy, etc.
After waiting for a while, try to visit your website once again and this time you’ll see the WordPress website with the theme that you’ve selected during the WordPress installation process. Congratulations, your WordPress website has been created and is ready to be customized!
A tour of the WordPress admin dashboard
Well, now you can see your website, that’s all fine, but how do you actually start building it? To do that, you first have to access your WordPress admin dashboard. Simply add /wp-admin at the end of your URL to go to the WordPress admin login page. For example: https:/ourlmswebsite.com/wp-admin
Then you’ll arrive at a page that asks for a username and password. Simply type in the username and password that you choose during WordPress installation from the cPanel and hit ‘Enter’ on your keyboard.

Now you’ve logged into your WordPress admin dashboard. This can be considered the HUB of your WordPress website. You can customize your design, manage your users, and manage comments. Q&A, etc. You can install plugins and themes and do so much more things.

If this is your first time seeing a WordPress dashboard then don’t be overwhelmed. All the options are located on the left side of your screen. Simply select an option and it will open up the relevant settings on the right side of the screen. As you install more plugins and themes, more options will be added to your dashboard.
Here’s a quick look at what the basic WordPress settings do:
- Dashboard: This is the first thing that you’ll see as soon as you log into your WordPress dashboard. It has 2 sub-menus, the home, and updates.
- Home: The interface on the right shows you the overall condition of your site and shows you notifications and alerts if there are any.
- Update: This is the part where you can check for your WordPress updates. Generally, all the security updates are automatically installed, for major updates, you need to do it manually. So you can do it from here.
- Posts: This is the option that lets you publish new posts or edit, or delete the previous posts. You can save posts as drafts and later on publish those when it’s convenient.
- Media: This is the part where you can upload images, videos, audio, etc. You can then access and use these media files when you are designing or building your website.
- Pages: You can add new pages to your website from this section. You can also edit or delete pages and also choose a URL for the pages. However, if you are using a theme that supports WordPress Full Site Editor these pages will be automatically added to your navigation menu.
You can, later on, edit your header menu with the editor.
- Appearance: This is the part where you can customize the appearance of your website. You can install, activate, and deactivate your themes from here. You can also customize your menu from this section. For example, if you have created a page and want to include it in your header menu, you can do it from here.
You can also create and manage widgets from here. Clicking on the customize button will take you to another screen where you will be able to customize various designs of your WordPress website.
- Plugins: This is the place where you can install, remove, and manage all your WordPress website plugins.
- Users: This is the part where you can manage all the users of your website. You can also add/remove users from here. You can also change user roles such as admin, author, editor, etc.
- Tools: Nothing much to do here if you’re a beginner. You can look at your site health, import/export data, check available tools, see scheduled actions, etc.
- Settings: Various site settings options are located here. From the General tab, you can edit the name of your website, the tagline of your website, the URL, etc. So if you’re not happy with the name of your website during the setup, you can change it from here.
There are other options here such as permalinks, privacy, writing, reading, etc.
That is the general explanation of all the options in the WordPress dashboard. If you install new plugins and themes, more items will be added to the dashboard. Don’t worry about it too much. As you keep using WordPress you’ll soon get the hang of it.
Getting Skillate and Tutor LMS Pro
Since everything is now setup, it’s now time to install our themes and plugins. For our theme, we will use Skillate. This theme is developed by Themeum for creating a professional multi-instructor or single instructor LMS website. The theme is optimized and designed to give you and your users the best LMS experience.

However, Skillate is not a free theme. We need to purchase Skillate in order to use it. If you look at the demo of the website, you’ll see how amazing the website looks. It also has many LMS features that you’ll love to use.
Skillate costs $79 for one website which might seem high, but when you’re building a website like Udemy, you must consider making some investment. And I think this is a great investment as it gives you so many features.
Installing Skillate in WordPress
Once you purchase Skillate, you’ll download a compressed file. Now you need to upload this file to your WordPress website. To do that, go to your WordPress dashboard Appearance > Themes, and then click on “Add New”. Then select the compressed file that you just downloaded.
Give it some time, Skillate will be installed in order for it to work you need to install all the required plugins. Before that, you can visit your website to see how everything looks if you want. Just hover your mouse over your website’s name on the top bar (beside the WordPress logo)

As you can see, your website has changed, but it doesn’t look like what we saw in the demo. That is because we haven’t imported the demo and haven’t installed the required plugins. So we are going to do that now. Head back to your WordPress dashboard.
Skillate actually has a setup wizard that you can use to install all the plugins including the demo importer. From your dashboard, go to Appearance > Skillate setup. Once you click on Skillate setup, the installer will launch and all you need to do is click on start and check the required plugins and click Install.

This might take a few minutes but after the setup is finished, visit your website and you’ll see the beauty of Skillate. This is the same demo that we had seen previously. If you explore the entire website, you’ll see that there are some demo courses. You can click on these courses and check out how your course will look when you publish those.
Of course, we will create our own courses and remove all these dummy ones. But before that, we need to talk about Tutor LMS.
Installing Tutor LMS Pro in WordPress
Currently, Tutor LMS free is installed on your WordPress along with other plugins. Tutor LMS is the heart of your LMS website. Using this plugin, you can create and sell courses. In fact, Tutor LMS free is one of the few LMS plugins that lets you not only create but also sell courses.
But we want to create a Udemy clone and you know that Udemy is a popular LMS marketplace with so many advanced features such as:
- Multi-instructor courses
- Q&A Forum
- Content Drip system
- Direct message or chat with an instructor
- Course prerequisite
- Materials included
- Assignments
- Quiz system etc.
Now, the free version of Tutor LMS is fine but for making a Udemy clone we need the Tutor LMS Pro. Previously we posted an article on Tutor LMS Free vs Pro where we conducted a thorough analysis of both the versions. If you want to learn more about the free and pro version you can check it out.

Tutor LMS Pro has all the features that you’ll need to create a website just like Udemy. Let’s take a look at a few of these features:
👉 Get Tutor LMS Pro NOW ✅
📌🔥 BREAKING: Tutor LMS Lifetime License Plan Available 🎉🔥
- Multi-Instructor marketplace/Single instructor website
- Frontend course builder
- 10 different quiz categories for your course quizzes
- Beautiful certificate templates
- Content Drip system
- Restrict Content Pro
- Course video from YouTube, Vimeo, HTML(from local drive), etc.
- WooCommerce, Easy Digital Downloads eCommerce integrations
- Commission management system
- In-dept course description (About course section) and much more.
When you start using Tutor LMS you’ll love it. So it is a recommendation for installing Tutor LMS Pro.
Activating Tutor LMS Pro License
We have purchased and installed Tutor LMS Pro but we haven’t activated the license. If you don’t activate your license then you’ll not receive updates. Themeum tries to integrate new technologies and designs to keep its products in the best state. Since you spent your money purchasing Tutor LMS Pro, why not activate the license?
Tutor LMS Pro is updated quite often to give you the best and latest LMS features. So it’s essential to get these updates.
Head over to Themeum’s official website and log into your account. Go to the Licenses tab. Here you’ll see your purchased products. Find Tutor LMS and click on “Add URL”. Then add the URL of your website and a license code will be generated for you.

Copy this license code and head back to your WordPress dashboard.
Now hover your mouse over Tutor LMS and click on the “License”. Now paste in the code and wait for a few seconds. Your Tutor LMS license will be activated.

Once your Tutor LMS license is activated, you’ll receive updates launched from Themeum. This will help you stay updated with the latest features of Tutor LMS Pro.
Activating Skillate License
Just like you activated Tutor LMS Pro, you also have to activate Skillate license to stay updated. The process is as similar to Tutor LMS Pro.
To activate your license, simply head over to Themeum’s official site and log into your account. From the licenses section locate Skillate. Add your URL and then a license code will be given to you. Copy this license code and head over to your WordPress dashboard. From here go to Options > License. Paste the code and wait for a few seconds for verification.

Once it’s complete, your Skillate License will be activated
Enabling Addons
Now that we have Tutor LMS Pro, we have access to all the premium add-ons. However, by default all the addons are disabled, we have to manually enable the addons that we will be needing for this project. From your WordPress dashboard go to Tutor LMS > Addons.
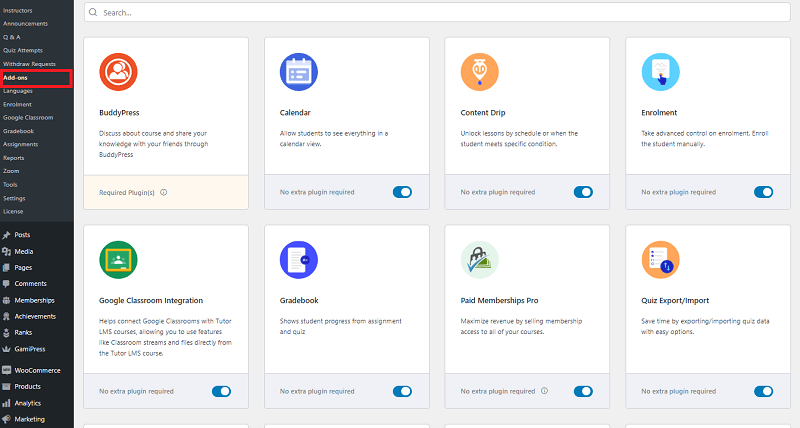
There are some addons that you can’t use until you download certain plugins. Keep those disabled for now and enabled the rest of the plugins. We might not use all of them but there’s no harm in keeping the addons turned on since we have the option available.
Going over some settings
Now all the premium addons are enabled and we are ready to create our first course. But before that, we need to configure some general LMS settings of our website. Hover your mouse over Tutor LMS and click on settings. It will bring up the LMS settings that are available. If you’ve enabled the Gradebook, Email, Notification, and Certificate addons, then you’ll see those options here.
General Settings

So we will be going over a few of these settings. From the General tab, you can go over all these options but from here, 3 options are very important:
- Enable Marketplace: If you enable this option, course instructors who are registered on your website can publish or upload their courses. Since we want to build a course marketplace like Udemy, you need to enable this option.
- Allow instructors to publish courses: Although the description of this feature looks similar to the previous one, its function is different. So when this feature is enabled, course instructors can publish courses directly on your LMS website. But if this option is disabled, when instructors upload their courses, it needs your (admin’s) approval in order to be published.
In many cases, this option is better if it’s disabled because you can check if the course follows your website’s guidelines or policies. But if your instructors are quite capable of publishing courses, then you can enable this option.
- Become an Instructor Button: If you enable this option, students will see the “Become an Instructor” button on their dashboard.
Course Settings

The course settings section is also very important. You should go over all these settings to ensure that your courses are the way you want them to be. Still, we are pointing out some important features here:
- Course Content Access: When you enable this option, admins and instructors can view a course without enrolling. You should enable this option because as an admin you might want to view how a course looks but you don’t want to enroll to do so.
- Content Summary: Enabling this feature will show the course content summary on the course details page. You should enable this feature as well because students might want to see the summary of the course and decide if they want to enroll in this course.
- Spotlight mode: Tutor LMS has a spotlight mode that hides the header and footer when a student is viewing the lessons of a course. This is a great feature that allows the students to concentrate more on the lessons so you should enable this option
- Course Completion Process: This gives you 2 options, Flexible and Strict. Select “Strict” so that students must pass all the lessons and quizzes (if any) in order to complete a course.
- Enable Lesson Comment: Enabling this feature allows students to leave comments on lessons. You could enable this feature if you want, this gives your student a chance to comment on various topics. Although there is a Q&A section for a course where students can ask and get answers from instructors.
- Preferred Video Source: This feature is very important. You have to select how you want to display video content on your courses. You can select HTML, External URL, YouTube, Vimeo, Embedded, or Shortcode. Select which one you prefer so that when you are creating a course you can add your videos.
If you don’t select any options from here, then you won’t be able to add any videos to your course lessons or topics.
Monetization Settings

The final setting that we need to discuss is the monetization setting. By default, it will be disabled and you won’t be able to create any paid courses. To create paid courses, you need to enable this option and configure your product’s price through WooCommerce or your preferred eCommerce plugin. You should go over each of the options thoroughly but we are still mentioning some of the important settings:
- Select eCommerce Engine: You can select which method of eCommerce will be utilized on your LMS website. You will have WooCommerce and Paid Memberships Pro available here. If you want you can install the Easy Digital Downloads plugin and select it from here. You can select WooCommerce as your eCommerce Engine.
- Enable Revenue Sharing: Since we are building a Marketplace with multiple instructors, your instructors need to get paid as well. To enable this option and revenue sharing between course instructors and admin will be available.
- Sharing Percentage: You need to define the sharing percentage of sales revenue between course instructors and admins. By default, it will be set to 80 – 20 meaning that instructors receive 80% revenue while admins receive 20% revenue. You can tweak this option but remember ideally the course instructors should receive the larger portion of the revenue.
- Deduct Fee: When you enable this amount, a small fee will be charged from the entire sales amount. You can use this fee to pay off domain & hosting or any other services. Of course, you could also disable this option if you want.
- Fee Description: So naturally your instructors might want to know why this fee is deducted. So this field gives you the option to explain why you are deducting this fee.
- Fee amount and type: In this field, you can select the fee deduction amount or percentage.
- Enable Withdraw Method: There are 3 ways through which you can withdraw money from the website bank transfer, e-check, and PayPal. You can select which ones you prefer (all 3 can be selected).
That concludes the Tutor LMS settings, now we are ready to create courses. But you should go through other options such as the design, advanced, notification, etc.
Setting up the course details and summary
To create a course, it is recommended to create a proper curriculum for the course. In Tutor LMS, we create topics and then populate those topics with lessons and quizzes. You can think of the topics as a chapter of a book and each chapter will have a number of lessons in them. So plan out your course contents and then start creating a course.
Once you have everything prepared, from your WordPress dashboard, go to Tutor LMS > Courses. Here you can see all the dummy courses that are currently in our Skillate theme. But we want to create a course manually. To do that click on “Add New”.

Now this will bring up the course builder. Here you can choose a name for your course and then tweak some settings. So, give your course a name by clicking on the “Add Title” section. The next section is the general settings for this course.
Before we actually start building the course lessons and quizzes, we should actually go through the course overall settings. We won’t be going through each and every option as it would take a lot of time but we encourage you to explore the course builder.

In the general setting, you can set the maximum number of students who will be able to enroll in the course (select 0 for an unlimited number of enrollments), select the difficulty level of the course, and decide if this will be a public course or not, and enable the Q&A feature for this course.
P.S If you enable the public course, your users don’t have to register to your LMS website in order to take this course. This feature is better left disabled because you want users to register to your website like Udemy.
Content Drip
If you don’t see this option, then you probably haven’t enabled this addon. Go back to add-ons and enable them in order to use it.
The content drip allows you to schedule your content. It allows you to restrict some of your course contents until a certain condition is fulfilled. You can choose the following options:
- Schedule course contents by date
- Content available after X days from enrollment
- Course content is available sequentially
- Course content unlocked after finishing prerequisites
The Content Drip feature is actually very important for an LMS website. So select the option that suits the policy of your LMS website.
Free or paid course
The next section lets you decide if you want this course to be free or paid. For now, leave it as a free course, I will show you how you can turn this course into a paid course after you complete creating this course.
Upload Attachments
You can also choose attachments for this course such as pdf files, lesson lists, etc. Just click on the “Upload Attachments” button and select the files you want to upload.
Course Prerequisites
This is a pro feature of Tutor LMS and becomes available only when you enabled the Course Prerequisites addon. So if a course is too advanced and students need to complete other courses on your LMS website, you can mention it here. Until your students complete those other courses, he/she cannot take this particular course.
This option is a bit serious because students cant access this course in any way until he/she completes the marked courses. If that is something that you want, then you can input those courses here.
What Will I Learn?
You can add what your students will be learning in a course using this feature. You can create a list of things that a course will contain and add those here. So when students go through course details, they can see this section.
Target Audience
As the name suggests, you can write for whom this course is meant. For example, if you are creating a course on Photoshop, you can add “Those who are looking to become a graphics designer”, “Those who want to improve their designing skills”, etc.
Total Course Duration
This feature lets the user know how long the course is. Generally, a course could be 1-12 hours long. It could also be higher. So just measure how each lesson is going to take and write the total course duration here.
Materials Included
Normally when you are building a professional course, you could include materials like articles, downloadable resources, certificates, etc.
Requirements/Instructions
You can also add special instructions for your students from this field.
Course Intro Video
A quality course should have an intro video explaining what’s the purpose of the course, what the students will be learning, how will this help the students, etc. So be sure to include an introductory video. Also, make sure not to make this video too long. Usually, intro videos are short and to the point. So keep it simple and precise.
Certificate Template and Certificate Builder
A special feature of Tutor LMS pro is the certificate templates. You’ll have a lot of beautiful certificate templates to choose from. If you want to design your own certificates, then Themeum has you covered. If you’ve purchased the Tutor LMS pro, then you’ll have access to the Certificate Builder for free.

To use this plugin you just have to visit Themeum’s website and click on Tutor LMS. Then find the Certificate Builder and download it. Then from your plugins section, click on “Add New” and locate the compressed file you just downloaded. It will be installed and ready to use!
If you want to learn how to create certificates using the certificate builder, you can check out our article.
Creating our first course
Now that all our course settings are taken care of, we can start building our course. However, there are 2 more things to point out. You can set your course category and featured image as well. To do that, look to your right, there’s an option for adding your course categories and featured images.

Next, to add your course topics and lessons, click on the “Add New Topic” button in the course builder. It will bring up an interface giving you the option to name your topic and add a description to it.

So give your topic a name and description and click on Add Topic. Once the topic is created you will see the option to add lessons and quizzes to that topic. If you’ve enabled the Assignment addon, you will see that here as well.
Creating a lesson
For now, we are not going over the assignment option. Let’s add a new lesson to your topic. Click on the “+ Lesson” button and it will open up the lesson builder. The lesson builder gives you the following options:
- Lesson Name
- Lesson Content (Consists of texts and images)
- Featured image of the lesson
- Video source
- Video playback time
- Upload attachments
- Enable/disable course preview
So fill out these fields and if you cannot upload your videos, make sure to enable it from the Tutor LMS settings. After you’re done, click on “Update Lesson” and that lesson will be added to your topic. In this way, you can create multiple topics and populate the topics with lessons.
After you add multiple topics and add lessons to it, it should look something like this:

You can also drag and drop the topics and lessons within topics to re-arrange them in any way you wish.
Creating a quiz
Ok, now we have topics and lessons but what about quizzes? Adding interesting quizzes makes a student more attentive and also gives them a chance to evaluate what they’ve learned so far. Tutor LMS Pro gives you 10 quiz categories to choose from. So just like you added lessons, click on the Quiz button to add a quiz event.
This opens up the quiz builder. It has 3 steps of quiz info, question, and settings. So for quiz info, give your quiz a title and a summary. Remember you are creating a quiz for a topic which students will have to take at the end of a topic.
After you’re done click on “Save & Next” to go to the next step. This is the questions section. You can add multiple questions to a course quiz. So from here click on “Add Question” it will then take you to the question creation settings. From here, before writing your question, decide what category you want to select for your question. There are 10 quiz categories:

We are selecting a True/False category for simplicity. You can select other categories such as fill in the blanks, short answers, image matching, ordering, etc. After you’ve selected your category, write your question in the above field. Then you have to select the correct option. For true or false, select if the answer is true or false. If you select a multiple choice or single choice question then you have the option to insert multiple options.
For short answers or open-ended questions, students have to type in the answer and then submit it. You can then check the answers and grade them. Once you’re done click on the “Add to Questions” button and your question will be added. This way you can add multiple questions for this topic quiz.
After that, click on “Save & Next” and then you can adjust some quiz settings. The quiz settings that will be available to you are:
- The time limit for the quiz
- Quiz feedback method
- Set passing grade
- Max questions allowed to answer
Then there are the advanced settings where you can decide if the quiz will auto start, hide/show question numbers, and define characters limit for short answers and open-ended questions. Once you’re happy with everything click on “Save & Next” to finalize your quiz.
Now our course is ready. It has all the necessary settings, topics, lessons, quizzes, etc. You can go through the entire course settings one more time, but when you’re ready click on “Publish” on the top left bar. Now your course is published and you can preview and see how it looks.
Creating a paid course
Our course is looking good but the problem is, it is a free course. We have to make it into a paid course in order to earn money. If you ran the Skillate setup Wizard, then it automatically installed the WooCommerce plugin as well.
To sell your courses, you need WooCommerce. There are other plugins and methods of selling courses but WooCommerce is most commonly used.
WooCommerce Setup
To monetize your courses, you need to run your WooCommerce setup first. Click on WooCommerce from your WordPress dashboard. The setup wizard should launch automatically. There are five steps of setting up your WooCommerce, store details, industry, product types, business details, and themes.

These are all very easy just fill out the forms with the appropriate information and you’ll be good to go. Make sure that you are inserting the correct information. If for some reason your WooCommerce setup doesn’t initiate automatically, you can launch it manually and also fill out these fields from the settings section.
To launch the setup wizard, From your WordPress dashboard go to WooCommerce > Home and select the steps that you want to setup.

You can also go to WooCommerce > Settings and fill out the fields from there. Once you’re done, you are now ready to create products and start selling.
Creating a product
Now that our WooCommerce is operational we can create products and add it to our courses. To do that from your WordPress dashboard go to Products (generally located below WooCommerce). If you don’t see this option make sure you’ve installed and activated the WooCommerce plugin. It should be installed and activated if you’ve run the Skillate setup.
From here, click on the “Add New” button to add a new product and give your product a name. We are giving the name of the course that we just created. It will be JavaScript Fundamentals. Scroll down and you will find the Product data area.

Here you have to decide if the course is downloadable, virtual, or for Tutor. We want to make it for Tutor so select that option. Then you will find 2 fields, the regular price, and the sale price. If you provide a discount on the product, fill out the sale price otherwise only the regular price. After you’re done select publish on the upper right corner of the screen.
Now head back to the course you just created and click on the 3 dots and select edit. Now scroll down and from the “Add Product” section select paid course. Then from the dropdown menu select the product that you just created.

After you’ve done this scroll back up and click on the update button to make your free course into a paid course. Congratulations, you now have a paid course on your LMS website.
So that is how you can create paid courses on your LMS website. Now following this process, create multiple courses and publish those on your new website.
Here’s your shopping list for this awesome project:
👉 Get HostGator Domain+Hosting (SALE)
Conclusion
Well, that wraps up our long article. We tried to cover the important parts as much as we could. Sure there are a lot more to discuss but it would only drag this article longer. So be sure to explore other features and options of Tutor LMS and Skillate. One of the reasons why we love using Tutor LMS is its user-friendly interface. So I believe you won’t have any trouble using Tutor LMS.
LMS is a booming industry and I think it is a smart investment. Even if you don’t know any sort of coding, you can still build this project from scratch. If you have any questions, or if you get stuck somewhere, feel free to ask us in the comments section.
So what do you think? Are you ready to take on the challenge and invest in an LMS website like Udemy? Let us know your thoughts in the comment section.
Disclaimer: This post may contain affiliate links and we may receive a small commission if you purchase something by following them. However, we recommend services/products that we believe good to serve your purpose.


