Tutor LMS Review – WordPress LMS Plugin with All You Need

Do you want to create your own online course website? Well, Tutor LMS is one excellent plugin that can help you do that. It is a freemium WordPress LMS (Learning Management System) plugin that you can use to create an online course-selling website. Whether it is a course marketplace with multiple instructors or a single course website with one or more instructors, with Tutor LMS, you can do it all.
In this Tutor LMS review, we’re going to take a look at all the features and possibilities this plugin has to offer. The LMS industry is very profitable as more and more people prefer learning new skills online. With the power of WordPress and the simplicity of Tutor LMS, you can create your own online education website all by yourself.
In this article, we’ll do a Tutor LMS review. It is said to provide you with all the tools and features to create your dream online education platform. And to top it all off, you can build your own LMS website without having to code!
So, we’ll find out if Tutor LMS is the best LMS plugin for creating the online education website that you want. Let’s get started
Some key features in the Tutor LMS free version
The basic version of Tutor LMS is available for free. Although it might not have enough features for a fully professional LMS website, you can still use it to create and sell courses online. Tutor LMS gives you a handful of features that you can use to create standard courses and monetize those courses Let’s take a look at some of the features of the free version:
- Intuitive Course Builder
- Able to add unlimited courses and lessons
- Personalized student and instructor dashboard
- Can monetize courses
- Course rating and review
- Course announcement feature
- Public profiles
- Advanced quiz builder with 4 quiz categories
- Q&A section
- Video player support
- Native eCommerce system
- PayPal payment method available
- Monetization support via WooCommerce, Easy Digital Downloads (EDD), etc.
There are tons of features available in the free version of Tutor LMS. Which is enough to create a basic online education platform. But if you want to create a more professional and feature-enriched platform, we recommend Tutor LMS Pro.
Some key features in Tutor LMS Pro
In this part of our Tutor LMS review, we are going to dive a bit deeper. We want to explore the key features of Tutor LMS and find out how good if indeed it is one of the elite LMS plugins.
Tutor LMS has always used the most cutting-edge technology to provide the best LMS solution to its users. It is evident, that more and more people are taking online classes today. People actually prefer learning online because it not only saves time but also seems more convenient. Tutor LMS Pro has been designed in such a way that you can create your online courses with the best of what modern technology has to offer.
Tutor LMS Pro follows a methodical and effective approach in providing quality education to online learners. With Tutor LMS Pro, you get the following features:
- A powerful course builder
- Advanced notifications options
- 32 email notification triggers
- More security features such as 2FA, fraud protection, email verification, etc.
- Advanced quiz builder with 8 categories
- Detailed quiz report for the students
- Certificate templates
- Certificate builder (the plugin must be downloaded separately)
- Detailed analytics reports
- Course bundling
- Assignment submission
- Content restriction
- Grading system
- Content drip
- Supports PayPal, Stripe, AmazonPay, Authorize.net, Mollie, Razorpay, etc.
- Special integration for videos in courses
- Google Classroom and Zoom online class integration
A great thing about Tutor LMS is that they put special attention on course instructors when you want to create an LMS marketplace. You can sell your own courses as well as allow other instructors to create their own courses on Tutor LMS. This way, you can create your own Udemy or Coursera clone!
👉 Get Tutor LMS Pro NOW ✅
📌🔥 BREAKING: Tutor LMS Lifetime License Plan Available 🎉🔥
Tutor LMS Review: A Detailed Look at the Key Features
Tutor LMS was first introduced in 2019, but very quickly it secured its place among the top LMS WordPress plugins. It is outfitted with some of the most advanced features that you could think of for selling online courses. So, let’s find out what are the key features of Tutor LMS and what makes it so special.
The Setup Wizard

We want to start our Tutor LMS review with the setup wizard. Tutor LMS is a plugin with a large number of features. When you’re getting started, the setup wizard can help you set everything up.

The setup wizard of Tutor LMS is clean, simple, and to the point. It presents you with a welcome screen and asks you if you want to create a single-instructor LMS website or a marketplace with multiple instructors. Based on what you choose, you’ll be presented with more options. You can simply follow the instructions on screen to complete your setup.
Once you’re done, you can finish your setup wizard and then start creating courses or you can also explore addons. The setup wizard gives you two options. Choose either one then get started with your new LMS journey.
Tutor LMS gives you 20+ premium addons to make your course building more advanced. We will talk about these addons in detail later but first, we want to explore other features of Tutor LMS.
👉 Get Tutor LMS Pro NOW ✅
📌🔥 BREAKING: Tutor LMS Lifetime License Plan Available 🎉🔥
All-in-one Course builder
If we are going to do a Tutor LMS review, then we must look at the most crucial part of the LMS. A course builder is one of the most important elements of an LMS plugin. Using a course builder, you can create your entire course and add various elements such as:
- Course details
- Defining course contents
- Add topics, lessons, quizzes, etc.
- Stating course requirements or prerequisites
- Course duration
- Options to create lessons or modules
- Add media files such as videos, images, audios, etc.
- Options to add quizzes
- Certification
👉 Bonus Video: How to Create a Course with Tutor LMS 3 (Complete Tutorial)
Tutor LMS Course settings
When you first open the course builder, you will see three steps on top, Basics, Curriculum, and Additional. You’ll begin on the Basics tab. Here you can add your course title, description, featured image, course category, tags, etc.

Next, if you scroll down, you’ll find the general settings. You can set the total number of students who can enroll in the course. If you set the number to 0, then there will be no limit to the enrollment. Then you can set the difficulty of the course. You can make it a public course if you want (users can take this course without registering as students). You can also choose the content drip settings for your course, but you have to enable the addon first.
Moving on, you can mention schedule the course. If you want, you can also add an intro video for your course. You can select a category for your course and also create categories from this section. You can also add tags.
Before we talk about the Curriculum step, let’s discuss the additional tab. In the Additional step, you can add additional data such as what will students learn from this course, who are the target audience, total course duration, and also include a list of materials that will be included in the course. You can also mention what students need in order to participate in the course. For example, if you are taking a photography class, it’s only natural to mention that students will require a camera, a tripod, lighting equipment, etc.
Tutor LMS Course Builder
Since we are doing a complete Tutor LMS review, discussing the curriculum step of the course builder is very important. This is the part where you can create topics for your course. You can start by clicking on the button labeled “Add Topic” and giving your topic a name. You can also add description, featured image, media files to your topics. After you’ve created a topic, you can add lessons and quizzes within the topic. You’ll see a few buttons at the bottom of each topic.
If you’ve already created your curriculum or lesson plan, you can simply keep adding topics. Once you’ve added all your topics and lessons, the interface will look something like this:

In this way you can structure your course. Now, normally, we only see two buttons at the bottom of each topics, these are the “Lesson” and “Quiz” buttons. If you have other addons such as the Assignment addon, Quiz Import/Export addon enabled, you’ll see more buttons.
Now after creating the course curriculum, you’d also want to add content within your lessons. You can simply hover your mouse over a lesson and click on the edit icon. This will open up a lesson builder and you can add content such as texts and images to your lesson. You can also add video to your lesson as well.
In the same way, if you add a quiz using the Tutor LMS quiz builder. It is interesting to point out that you can create everything, your topics, lessons, quizzes, etc. just from this single builder. You don’t have to visit other pages to edit lessons, quizzes, assignments, etc.
Course Intro Video
If you want to add a course intro video to your course, you can do it from this screen. But before you do, you need to enable video options from your settings. Once you do that, you can add your video according to the options that you have enabled.

You can select how you want to include your course intro video. Select your preferred options from the drop down and add the URL or upload your video. Once you to, you’ll have these video options available for your course intro video.

In the screenshot above, we have added one of our YouTube videos as the intro video of this course. This is just to show you how the intro video looks like when you add the YouTube URL.
You can add videos to your lessons in a similar fashion. To do that, first click on the edit icon beside your lesson in the course builder. On the right side, you’ll find the same interface for video that you saw in the Basics tab of the course builder. Then if you want to upload your video, you can simply browse your file or if you want to add the URL to your YouTube or Vimeo link you can also do that.
Tutor LMS also has its own video player that you can use. To learn more about it, check out our Tutor LMS video player post.
Certificate Templates
At the bottom of the Additional tab of the course builder, we can see several certificate templates. This will be available if you have enabled the Certificate addon. If you have Tutor LMS Pro, enable the Certificate addon and you’ll see the certificate templates in the course builder.

You can use any of these certificates for your courses. That’s not all, you can hover your mouse over a template and click on the preview button to have a closer look at the certificate of your choice. You can choose either landscape or portrait mode for the certificates.
Tutor LMS has also introduced a unique plugin called Certificate Builder, which you can use to design your own certificates. We will take a look at this plugin later on in this article.
Well, that pretty much covers the course builder. Through the Tutor LMS course builder, you can create a complete course. You can add your course details, create course curriculum, and also add course additional data. Finally, you can also add a certificate for your course.
👉 Get Tutor LMS Pro NOW ✅
📌🔥 BREAKING: Tutor LMS Lifetime License Plan Available 🎉🔥
Easy Lesson Editing
Previously we mentioned that you can create topics for your course and add lessons to the topic directly from the course builder. The lesson editor or lesson builder is a part of the course builder. Through this editor, you can quickly add lessons to your topics.
Once you open the lesson builder, you have the option to name your lesson and include the contents of the lesson. You can add texts, images, and other media files and attachments to your lesson. You can also choose a featured image for your lessons.

As you can see, you can add the lesson title and content from this builder. Within the content, you can add images, videos, audios, etc. You can also add video for the lesson just like course intro video.
Tutor LMS also supports AI. By connecting your Tutor LMS site with OpenAI you can use the AI to generate your course content such as title, descriptions, features images, etc.
Creating Quizzes with the Advanced Quiz builder
Quizzes make your course more interesting and engaging at the same time. Now if you add different types of questions, with points, time limit, feedback, etc. you’d have a perfect course!
Tutor LMS Pro gives you that advanced quiz builder where you can do all of that. Right next to the lesson button, you’ll find a button labeled “+ Quiz”, clicking on it will open up the quiz builder. Next, you can create a quiz in 3 steps:
- Step 1: Give a name and description to your question
- Step 2: Select a question category and create the question
- Step 3: Customize the question conditions and settings of your quiz

Tutor LMS offers you 8 different quiz categories to select from. If you have the free version, you will have access to 4 quiz categories. The free quiz categories include:
- True/False
- Multiple choice
- Open Ended/Essay
- Fill in the blanks
With Tutor LMS Pro you can build Short answer, Matching, Image answering, and Ordering questions. You can select any of the available categories, and the builder will give you all the relevant options to create your question.
You can also customize your question conditions and quiz settings after you’ve added some questions. In the quiz settings you’ll see basic and advanced sections. In the basic section you’ll find the following options:
- Set a time limit to your quiz
- Hide quiz time
- Choose quiz feedback where you can show the correct answer, provide a chance to retry, or show results after a quiz attempt
- Allow multiple quiz attempts if the answer is incorrect
- Set a passing grade
- Set the maximum questions the student is allowed to answer
Right after the basic settings, you can select the advanced quiz settings. This section gives you the following options:
- Enable/disable quiz auto start
- Question layout (can be set to single question, question pagination, question below each other)
- Question order (can be set to random, sorting, ascending, and descending)
- Hide/show question number
- Set Character Limit for Short Answers
- Set Character Limit for Open-Ended/Essay Answers
And just like that, you can create your quizzes with Tutor LMS! However, it is important to note that you can include multiple questions in a single quiz segment. In the screenshot above, you can see we have added 8 questions within one quiz. We actually added all the 8 question categories. If you want to learn how to create questions using Tutor LMS Quiz Builder, you can check out our video where we showed you how we created all the questions.
👉 Video: How to Create Quiz in Tutor LMS 3
In this way, you can keep adding quizzes to one segment. If you want, you can also add multiple quiz segments to one topic. This is useful if your lesson contains a discussion on various subjects. Then you can create a quiz segment for each of those subjects. It might seem a little confusing at first, but trust me, once you get used to these settings, you’ll love it! 👉 How to Create Tutor LMS Quiz (Step-by-Step)
Dashboard – A clean and modern Dashboard for instructors and students
In the latest update of Tutor LMS 2.0 a new dashboard for students and the instructors has been included. The dashboard has a clean and colorful interface and the students and teachers can access everything from here. Both of the interfaces are different with different set of information.
Student dashboard
Let’s take a look at the student dashboard first.
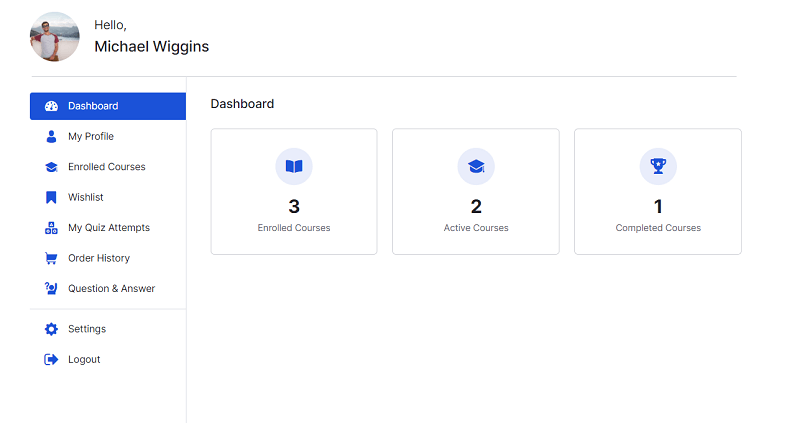
As you can see, in a student dashboard, the students will be able to see which courses they have enrolled in, active courses, completed courses. They can also customize their own public profile and use their own photo. Students can also create a wishlist of the courses they want to take in the future. This wishlist is saved and they can access it anytime from the dashboard.
Instructor dashboard
The instructors will have a separate dashboard. The first thing the dashboard lets you see is your course analytics. Here the instructors can get the details on how many courses they have actively, the total number of students, total earnings, etc. To get the details on the courses created by the instructor, they can scroll down and look at each course.

The instructors can also customize their public profile from the dashboard, check out quiz attempts, make announcements, check assignments, or even answer students’ questions. There’s a notification icon in the top right corner of the dashboard, which alerts the instructor when a new message arrives or an event occurs.
Instructors can also start creating a course by clicking on the button located in the top right corner. They can also go for a withdrawal if they want. Basically, everything you need is within the reach of this personalized and convenient dashboard.
Email notifications
The email notification feature is very important as it can be used to notify students and instructors of various events. Tutor LMS puts special attention on email notification. In fact, there are in total 32 email notification triggers or events. What’s more exciting about it is, in the latest Tutor LMS 2.0 update, Themeum added various email templates for you to choose from. You can now customize the templates and also send a test email to check if everything works.
You can access the email settings from your WordPress Dashboard > Tutor LMS > Settings and then select Email from the side menu list.

In the settings menu, you can setup under what name and email address the emails will be sent. You can also write the contents of the email.
Emails can be sent to students, teachers, as well as the admin. You will also be able to enable/disable the email notification and customize the emails. Scroll down and you will find the emails that can be sent to the students. With these emails, you can notify the students whenever they enroll in a course, complete a quiz, complete a course, when a new assignment is published, when a new announcement is made or updated, when an instructor grades their assignments, and so on.

This gives you so many customization options. It truly depends on what you are looking for. Carefully go through the email sections and also edit the templates since you’ve been given the power to do so!

Email notifications can also be sent to the instructors. Through this, the instructors can be notified when a student enrolls in one of their courses, when a student completes a lesson, when a student submits an assignment, when a withdrawal request is approved, etc. You can send any notification you want.
The Admin will also be notified with emails. There are 6 email notification triggers for the admins. The admin can be notified when the following event occurs
- When an instructor has signed up
- When a student has signed up
- When a new course is submitted for review
- When a new course is published
- When a course is edited/updated
- When a new withdrawal request is made
- When a new order is placed
- When order status is updated
All of these can be enabled or disabled from this settings page.
👉 Get Tutor LMS Pro NOW ✅
📌🔥 BREAKING: Tutor LMS Lifetime License Plan Available 🎉🔥
Secured Authentication for Tutor users
Tutor LMS also introduced more authentication features for better security. You can access this from Tutor LMS Pro > Settings and select the Authentication tab. You can enable Two-Factor Authentication for Tutor LMS, fraud protection, email verification, social logins, etc.

In order to better protect your LMS website and your users, you can use these authentication features. You can also check out our video on this topic.
👉 Video: How to Secure a Tutor LMS Site in 2025 (Quick Guide)
Certificate builder – A unique and creative way to customize certificates
In the course builder, we’ve seen some certificate templates that you can customize and add to your courses. But what if you wanted to design your own custom certificate? For this reason, Tutor LMS has introduced the Certificate Builder. This plugin gives you a separate interface to design your own certificates the way you want.
But this does require you to have Tutor LMS Pro. The Certificate Builder is a separate plugin that you have to download from Tutor LMS official website. Currently, this plugin is not available in the WordPress plugin repository. After you’ve downloaded the compressed file, upload it to your WordPress website then install and activate it. You’ll find the certificate builder on your Tutor LMS settings.

Once you click on the ‘Create certificate’ button, it opens up the builder where you can make your own custom certificates. You can select one of the many templates available, or you can start with a blank canvas and start designing everything one by one.

With this builder, you can make your design however you want because you are no longer limited. Now you can unleash your creativity and design to your heart’s content!
Monetization – Selling courses is so easy now
Tutor LMS gives you great flexibility in terms of monetization from your LMS platform. If you are running a marketplace with multiple teachers, the distribution of the money becomes a bit complex. Tutor LMS gives you the option to select the instructor commission rates as we’ve seen in the setup wizard earlier.
Monetization in Tutor LMS works in 2 steps:
Fees deduction: This is the first phase where a percentage of revenue is deducted. The rest of the revenue can be distributed among the instructor and admin. This option can be enabled or disabled anytime the admin wants.

Commission: This option lets you set the percentage of commission your instructors receive. This option is available if you’ve chosen the marketplace category for your LMS website. You can set the percentage through the setup wizard or by going to Tutor LMS > Settings > Monetization.

Besides the fee and commission mechanisms, Tutor LMS also gives you the following monetization options:

Select your eCommerce Engine: Tutor LMS has a native eCommerce system that you can use. If you don’t want to install extra eCommerce plugins, you can use the native eCommerce engine. Tutor LMS also supports WooCommerce, WooCommerce Subscriptions, Easy Digital Downloads, Paid Membership Pro, and Restrict Content Pro. After installing an eCommerce plugin, you have to select it from “Select eCommerce Engine” drop down in order to use it.
Subscriptions: You can also enable subscriptions for your online courses using Tutor LMS. If you enable the Subscription addon, you’ll find a new option under Monetization. You can see two subscription options here, cancel anytime and early renewal. You can enable or disable these options from here.
Payment Methods: From this section, you can select your payment methods. By default PayPal will be added. Even in the free version of Tutor LMS, you’ll find PayPal as your default payment method. But you can also add new payment gateways by clicking on the “+ Add New Gateway” button. Tutor LMS supports several payment gateways such as Stripe, Mollie, Authorize.net, Razorpay, Paystack, Alipay, Klarna, etc.

You can also add manual payment options.
Taxes: You will have a lot of options for setting up taxes in different regions. You can choose the country along with its various regions and apply various rates.
Checkout: In the checkout tab, you can choose if you want students to apply coupon codes during checkout. You can enable this one option from this section.
Analytics and reports – Complete statistics of your LMS website
Tutor LMS Pro gives you a cool report and analytics feature. Note that we’ve said “Tutor LMS Pro” which means this feature is only available in the pro version. The report and analytics presents you with a dashboard that gives you an overview of your LMS website’s overall statistics. It is available on Tutor LMS > Reports. If you don’t see this, then maybe your Reports addon isn’t enabled. Go to the addons and then enable the Reports addon.
Tutor LMS reports are divided into 5 sections which are overview, courses, reviews, sales, and students. The overview section gives you the overall site statistics. This includes information on
- Enrolled courses
- Courses enrolled
- Lessons
- Quiz
- Questions
- Instrucotrs
- Students
- Reviews
If you scroll down, it will show you a graph of the money earned. Moving down you can get the stats on most popular courses, last enrolled courses, recent reviews, newly registered students, newly registered teachers, etc.

The entire reports section is very detailed. If you click on the courses tab, you’ll find all the courses in your LMS website listed. Click on the details of a course and you can see the overall statistics of that particular course. The same goes for reviews, sales, and students. You can click on each of those elements to see more detailed reports on that topic.
How does your course look on the frontend
Once you create and publish your course, it will be available on your LMS website. You might have noticed that, through your entire design process, you didn’t have to design anything. You just need to use the backend or frontend builder to create your course. But how does your course look from the frontend? To check out how it looks, we previewed our course in the default Twenty Twenty Two WordPress theme.

Although there are some features that we haven’t explored but this is what your course should look like by default. You can also customize the design if you want through the Gutenberg page builder. But you have to enable Gutenberg from the settings in order to use it. Don’t forget to click on save after you enabled Gutenberg.

You can also use the Elementor page builder to customize your course layout. There’s a plugin called Tutor LMS Elementor Addon developed by Themeum. It has some custom element blocks which you’ll find useful when you are designing your pages. We will discuss these extra plugins later in the article.
Course bundle
There’s also option to bundle your courses. If you want, you can bundle multiple courses and provide a special price for the package. This will encourage more students to take the course as they can get more courses at a discount.

So you can sell more courses and make more profit. You can display your course bundle and show the price of all the courses and the discount price as well.
Some Tutor LMS plugins
The developers of Tutor LMS have also created some great Tutor LMS plugins to help you in your LMS journey. But wait, didn’t we just say that Tutor LMS is an “All-in-One” LMS solution? Then why does it need extra plugins? Well, I stand by my statement. Tutor LMS is an All-in-One LMS solution. These extra plugins were developed to give you something more. So in this part of our Tutor LMS review, we are going to look at these extra plugins.
Although it isn’t required to install these plugins, these can give you something extra to make your LMS website more special. Since this is a Tutor LMS review, we won’t go into that much detail about these plugins. So, here are some Tutor LMS plugins to up your game:
Tutor LMS Elementor Addons
The name of the plugin perfectly describes what it is. Tutor LMS Elementor Addons integrates your Tutor LMS with the Elementor page builder. If you want to build and customize your LMS website with Elementor, then this plugin will definitely come in handy. With Tutor LMS Elementor addons you can do a lot of things such as:
- Create a course page template from scratch
- Customize each course page with your own unique design
- Use 26+ widgets to your advantage
- Use 4 different course carousel styles
Certificate customizer for Tutor LMS
This plugin helps you customize your certificates in your Tutor LMS Pro. Since the introduction of the new Certificate Builder of Tutor LMS, this plugin might be removed from the repository. But it’s still useful if you want to customize your certificates.
Oxygen Tutor LMS
This plugin is for those who love the Oxygen page builder. With this plugin, you will be able to connect Tutor LMS with a robust page builder, Oxygen. You will be able to create and customize your own theme for your LMS platform. Oxygen also has a big library of pre-made designs that you can use.
To use Oxygen, you need to install the following plugins:
- Tutor LMS (Pro or Free either will do)
- Oxygen page builder
- Oxygen Tutor LMS (this plugin basically!)
Tutor LMS – Migration Tool
If you are using LearnDash or LearnPress and you want to switch or migrate to Tutor LMS, then this is the plugin for you. Using this tool you can transfer your current LMS database that consists of courses, quizzes, order data, etc. to Tutor LMS.
Using this plugin ensures that you have the latest version of Tutor LMS installed on your WordPress website. Then install this plugin and start your migration process. If you want to use it, you can check out our post on how to migrate from LearnDash to Tutor LMS. If you are using LearnPress then you can check out our post on how to migrate from LearnPress to Tutor LMS.
Tutor LMS Divi Modules
If you are using the Divi page builder, then don’t worry, Themeum won’t leave you hanging. With Tutor LMS Divi Modules, you can connect Tutor LMS with the Divi Page builder. It lets you create your own course page template from scratch and save it for later use. You can customize each of your course pages the way you want. There are 26+ Divi modules to help you create your own unique design
However, there are some prerequisites for using this plugin. You need to have the following plugins installed and activated:
- Tutor LMS (Free or Pro)
- Divi Page Builder
Best Themes for Tutor LMS: Native Themes
I know what you might be thinking “How is a theme a part of Tutor LMS review?” Before you jump to any conclusions, let me tell you something. Deciding on which theme you are going to use is very important as it dictates the overall outlook of your website. Since you are building an LMS website, it is a smart decision to choose LMS based WordPress themes. And the native themes are the best themes for Tutor LMS.
Tutor LMS sits well with many different themes, but the good news is that Themeum has built 4 native themes for Tutor LMS. You can use any of these themes to make your eLearning platform stand out. Let’s check out some of these themes.
1. Tutor Starter (Free!)

Tutor Starter is a robust WordPress theme that is perfect for building an eLearning marketplace, solo instructor website, academic institutions, and any online education platform in general. What’s great about this theme is that it’s free.
2. Skillate

Skillate is another amazing WordPress theme that is powered by Gutenberg. The theme has been designed keeping the student’s online education experience in mind. The navigation system of the theme has been created in such a way that students can find their courses faster and enjoy an amazing learning experience.
3. Docent Pro

Docent Pro is another Gutenberg based WordPress theme that is more focused on single instructor LMS websites. This theme has a well designed instructor profile page, course builder, quiz creator, and other facilities of Tutor LMS Pro. It includes the default as well as custom Gutenberg blocks that you can use to get your site ready in a short time.
4. Edumax

Edumax is also a theme that serves similar functions as the Language School theme. It is more focused on educators, coaching centers, and other educational institutions. It has been designed with WP Page builder so you can quickly create your dream eLearning website.
You can also use themes like Astra, Divi, etc. as Tutor LMS is compatible with most themes. If you want to learn more, you can check out our post on the best themes for Tutor LMS.
Tutor LMS Pricing
With all the features, themes, and facilities, discussed, it’s now time to look at the Tutor LMS pricing. To make our Tutor LMS review more complete, let’s discuss the pricing. We can see how Tutor LMS managed to attract so much attention. Along with all the diverse and important LMS features, it also focuses more on better user interface and experience design.
Tutor LMS has annual and lifetime plans. Here are the annual plans:
| Plan | Annual cost |
| Basic | Free |
| Individuals | $199 |
| Business | $399 |
| Agencies | $799 |
Tutor LMS has annual and lifetime plans. Here are the annual plans:
| Plan | Annual cost |
| Basic | Free |
| Individuals | $499 |
| Business | $999 |
| Agencies | $1,999 |
All the plans have a 30-day money-back guarantee and a processing time of 48 hours. There is no hidden charge and no auto-renewal, so you can relax. Another great thing about Tutor LMS Pro is that you don’t have to purchase anything else separately. You get all the features and premium addons with all paid plans! (Note, premium themes are sold separately). With that being said, this brings our Tutor LMS review to an end.
👉 Get Tutor LMS Pro NOW ✅
📌🔥 BREAKING: Tutor LMS Lifetime License Plan Available 🎉🔥
FAQs
Is Tutor LMS Free?
Yes. Tutor LMS has a free version for you to use. It’s also one of the few LMS plugins that allows you to sell courses with the free version.
How to create paid courses in Tutor LMS?
You can use the Tutor LMS free to create a paid course. First, you need to go to Tutor LMS > Settings then select the Monetize tab and select any eCommerce integrations such as WooCommerce, Paid Membership Pro, Restrict Content Pro, etc.
For example, let’s say we’ve enabled WooCommerce as our monetization option. Then create or edit the course that you want to be paid for, then find the “Add Product” section. Here, click on the “Paid” option and more fields including course price will appear. Fill out these fields and save your changes. That’s how you can create paid courses.
How to become a Tutor LMS instructor?
Tutor LMS by default creates an instructor registration page. You can access it by clicking on Pages from your WordPress dashboard. You can also create your own registration page. After finishing the registration you can become a Tutor LMS instructor
For whom Tutor LMS is meant for?
If you want to sell courses on your own LMS website, then Tutor LMS is for you. No matter if it’s a single course or a multi-course marketplace, you can do it all with Tutor LMS.
How much does it cost to make an LMS site?
The answer to this question varies. Some can even create an LMS site for free, but that will have extremely limited capabilities. It depends on what plugin you’re using. Tutor LMS has some really great plans and you can make an advanced LMS site for a standard rate. But normally, it might take you between $100-$1200 to create an LMS site.
How to create a course in Tutor LMS?
is really simple to create a course in Tutor LMS. After you install the plugin, navigate to Tutor LMS > Courses and click on Add New button. Now using this modern course builder, you can create your entire course. If you have Tutor LMS Pro, you can also use the frontend course builder.
How to conduct live online classes in Tutor LMS?
You can conduct live online classes in Tutor LMS using the Zoom integration. However, you do need Tutor LMS Pro for this as the Zoom integration is a premium addon. You have to enable Zoom from Tutor LMS Pro > Addons and enable Zoom. You have to have a zoom account to setup your server-to-server OAuth app.
Can I use Google Classroom with Tutor LMS?
Yes, you can use Google Classroom on your Tutor LMS site. However, you do need Tutor LMS Pro as it is a premium addon.
How to get Tutor LMS at a discount?
Themeum (the developers of Tutor LMS) are always offering some deals now and then. This allows you to get Tutor LMS at a discount price. You can also use our coupon code for a 20% discount. Check out our post to get the coupon code.
Conclusion
We have reviewed some of the popular LMS plugins for WordPress. We must say Tutor LMS is certainly a great product. Themeum has developed a polished and all-in-one LMS solution. While doing the Tutor LMS review we found it to be very beginner-friendly and feature-enriched.
Tutor LMS gives you flexibility for monetization and provides options to customize your commission and fees. Selling courses with Tutor LMS is so easy and painless. The dashboard also gives your students a personalized look and a HUB from where they can navigate the entire website.
Overall, Tutor LMS is a true spectacle when it comes to providing LMS solutions. If you are looking to build your online education platform, then we definitely recommend this plugin. As there’s a free version, you can get started and see for yourself if this plugin suits your style.
We hope you liked our Tutor LMS review. We know it looks a bit lengthy but we tried to be thorough. Almost all the LMS plugins have a robust architecture, especially Tutor LMS. Starting to build your own online education platform is an important decision and we wanted to help you choose the best plugin. If you have any questions regarding Tutor LMS, do let us know in the comment section. Happy Tutoring!
Disclaimer: This post may contain affiliate links and we may receive a small commission if you purchase something by following them. However, we recommend services/products that we believe good to serve your purpose.


