How to Customize WordPress Admin Dashboard (Complete Guide)

Looking to customize the WordPress admin dashboard? It will offer you a more personalized and streamlined admin experience. Learn here how to do that.
Every website owner deserves a more well-organized experience for them and their clients. Regardless of your needs, we understand the feelings of the admins who seek something truly theirs.
In this article, we brought you a WordPress dashboard customization guide that will let you customize your WordPress admin panel. Let’s learn how to personalize the WordPress admin dashboard without further ado.
How to customize WordPress admin dashboard?
WordPress default options let you hide some of the widgets from the dashboard. However, it does not offer much customization abilities. You will get a Screen Options menu on the upper-right corner of your WordPress dashboard. You can use it to hide some specific widgets from your dashboard.

But if you want more customization abilities, you can use a plugin. There are a bunch of dashboard plugins in the market that allow you to customize and change the visual aesthetic of your WordPress admin dashboard. These let you modify & make changes according to your visual preferences.
WP Adminify is such a WordPress admin panel customization plugin. It’s free with other paid plans, which lets you customize everything on your WordPress admin panel with some extra functionalities. It’s a good tool for those looking for a change from the traditional admin dashboard design.
Why use WP Adminify?
WP Adminify is a freemium WordPress plugin, and one of the biggest reasons we chose Adminify is the customization options. Adminify is not just a plugin that lets you make your dashboard from bright to dark. It allows you to change the whole dashboard and jazz up your site.
Furthermore, Adminify lets you toggle on/ off everything, so if you have any sections or parts you don’t want to see, you can get rid of them anytime. It has a 14-day money-back guarantee, which allows new users to change their minds if they don’t like it.
Here are some noteworthy benefits of WP Adminify:
Lightweight
When adding a plugin to a WordPress site, one question haunts the users: whether the plugin will slow the overall site. Or how much impact it will have on the performance.
Well, with Adminify, you do not have to worry about this. Upon using it, we observed that Adminify developers tackle this issue very well. As a result, Adminify is incredibly lightweight and provides an immensely slick performance.
Super fast
Another thing that made us compliment the developers is the super fast-loading screens. We expected it to be fast, but our results were impressive.
The script loads swiftly and seamlessly, which helps to browse the WordPress Admin Dashboard and make adjustments in seconds.
Not to mention, Adminify has other speed-improving features that reduce the speed/time loss when used, which makes the user experience even healthier in the long run.
Anything is customizable
With up to 20 core features, the WP Adminify plugin breaths of customizations. This WordPress customization plugin lets you modify and personalize practically every element of your WordPress admin dashboard.
From customizing the admin login page to anything you want to change or modify, you can do it in just a few clicks. Font size, logo height and width, and component alignments are some of the things among many.
👉 Learn More: WP Adminify Review – WordPress Admin Customization Made Easy
Simple and user-friendly
The plugin’s user-friendly UI astounded us. All of the functions are explained in detail so that every level of WordPress user can understand whether they are new in the field or a WordPress expert.
It does not matter if you have previous experiences or not if you do not want any functions being seen on the screen. You can toggle it off with a switch with ease.
So the new users do not have to worry about your capabilities before getting it.
Customize WordPress admin dashboard using WP Adminify
Before customizing your dashboard, you need to install and activate the plugin from your Plugins tab.
- First, log in to the dashboard of your WordPress site.
- Hover your mouse over Plugins from the dashboard and click Add New.

- Type Adminify in the search box, click Install Now for WP Adminify, and select Activate to activate the plugin.

You will be greeted with a welcome page saying, “Welcome to the future of configuring WordPress! Thank you for choosing WP Adminify.” Click on Let’s Go.
The Module Settings page will let you decide to toggle off the modules you want in your dashboard.

The modules are:
- Dashboard Design UI
- Folders
- Login Customizer
- Admin Columns
- Menu Editor
- Dashboard & Welcome Widget
- Pagespeed Insights
- Header/Footer Scripts
- Quick Menu
- Menu Duplicator
- Notification Bar
- Activity Logs
- Post Duplicator
- Admin Pages
- Sidebar Generator
- Post Types Order
- Server Info
- Disable Comments
Every module is enabled by default. If you want to turn something off, disable it from this page and hit Continue.
On the Design Setting page, you can choose the theme color of your dashboard. Simply clicking the toggle button will change it to Light mode. By default, it’s selected as Dark Mode.
- Logo Type: This lets you choose whether you want an Image or plain text. If you choose an image, select the logo file according to your Dark/Light mode theme.
- Admin Footer Text: If you want, you can set your admin footer text.
- Now select the Continue button to advance to the next page.

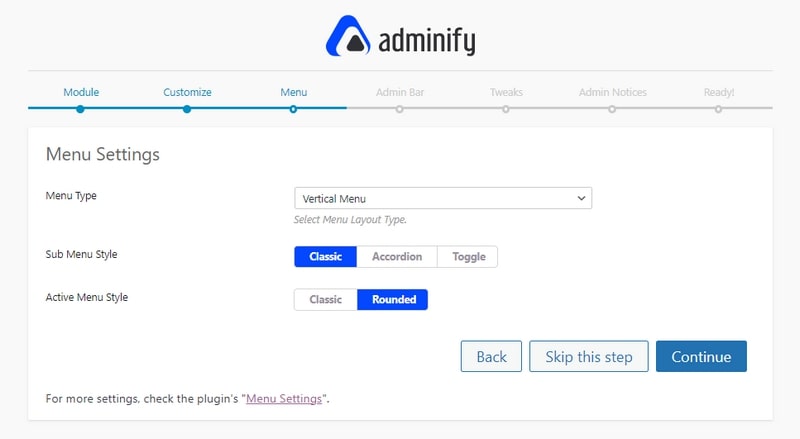
The Menu Settings lets you select the Menu type you prefer.
The Admin Bar Settings page allows you to hide and show Admin Bar Settings, Search Form, Comments Icon, View Website Icon, and Light/Dark Switcher.

Tweaks Settings lets you tweak advanced functionalities of the dashboard, such as Remove Shortlink, Disable XMP-RPC, Remove Feed Links, Remove Gravatar Query Strings, and more.

Go to the next step. The Admin Notices provides only more advanced options to hide and remove, such as the abilities to Hide All “Admin Notices, Remove Welcome Panel, Remove “PHP Update Required” Notice, Remove the “Try Gutenberg” Panel, Hide Core Update Notice, Hide Plugin Update Notice, and the Hide Theme Update Notice.
At this point, the initial configuration of Adminify on your site is complete.
Now click the Go to WP Adminify Dashboard button to finish the process.

Now, let’s further know about the other customization options to give your website its identity.
Customize WordPress login page
Adminify allows you to change and customize your WordPress login page with built-in templates, desired font, logo, form fields, custom button layout, and more with its paid version. You get some limited functionalities in the free version too. This option is located at WordPress Dashboard > Adminify > Login Customizer.
If you don’t want to do the customizing yourself, you can choose from Adminify’s pre-made templates. For that, select Login Customizer from the WP Adminify tab.

- Click on Templates

- Select the template design you like and press Publish to implement it on your website.

Toggle dark mode
Turning Dark mode on and off is easier with the Adminify plugin because there’s a dedicated button to switch between two modes at any time. For that, you just need to click the toggle button on the top-right corner of the dashboard.

Change the dashboard theme
With WP Adminify, you can change the whole theme color of the dashboard within a few clicks.
To change the dashboard color scheme:
- Click on the WP Adminify settings and go to Customize.
- Select any color from the Adminify UI Templates.
- And hit Save.

You can also change the dashboard font, style, size, and font color from this menu.
Also, you can spice up with the Custom Color Preset and select Background types Color, Image, Gradient, Slideshow, Use custom font and Videos. However, you will need the WP Adminify Pro version for that.
Add custom folders and categories
Custom folders and categories are two of the most essential features of WP Adminify. The plugin allows us to create categories for our posts, pages, and media by creating folders and storing them.
To create custom folders:
- Go to All Posts from the Post tab.
- Click on the Create New Folder.
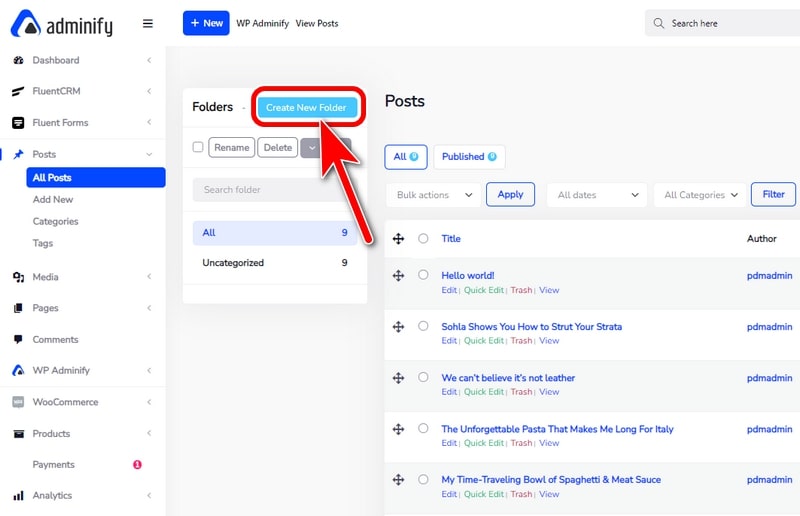
- Give it a name and click on Save.
After creating the folder, you can drag and drop posts in the folder.

With the custom folders and categories, users can easily manage their media, posts, and products.
Use admin columns
The admin columns module allows you to change the order of columns to view posts, pages, and the renames of the columns. This means you can change the order to the author, which sometimes can be helpful in finding posts made by authors and other orders.
You can also choose different names for the column titles. Here are the example of renaming and changing the order of the admin column.
- Go to WP Adminify and select Admin Columns.
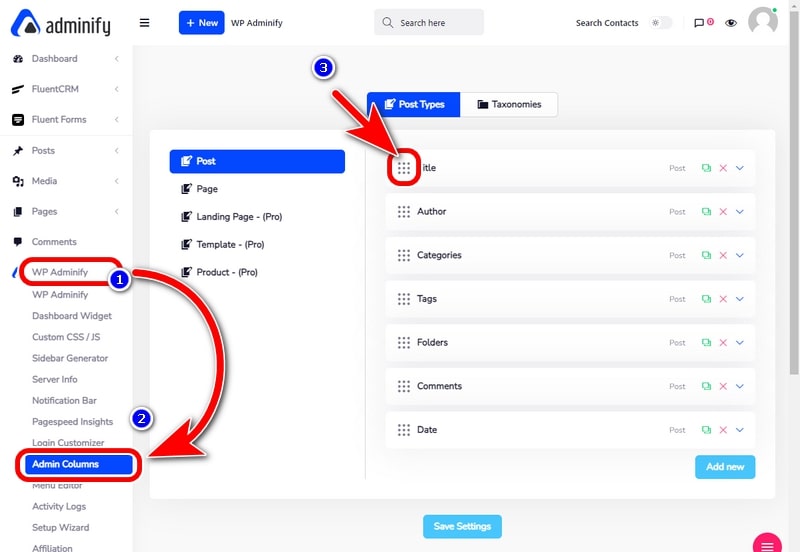
- Hold and drag to reorder according to your preference and click on Save Settings.
Here’s a quick compressions of before and after changing the column order.

Customize the dashboard menu
Suppose you are wondering how to rename or change the menu item orders of your default WordPress Admin Dashboard. Then we have good news! You can certainly do that with the help of WP Adminify.
The Menu Editor allows you to change the menu items’ order within your actual WordPress backend menu.
To change the order of dashboard menus:
- Go to the Menu Editor underneath the Admin Columns.
- Drag the menu items to modify the orders of menus.

Adminify also allows adding a custom menu tab, but you need the WP Adminify Pro for that.
Use custom CSS/JS
Custom CSS / JS lets you add a custom-made header and footer to your website. This module is convenient for those who use an extra plugin to do the same work.
To use this module, go to Custom CSS/JS from WP Adminify and choose where the custom header and footer will be displayed.
- Click on Add New Snippet.
- Select the position where your custom snippets will be displayed, such as Header, Footer, Before Content, or After Content.
- Select the coding languages you are comfortable with between CSS and JS.
- Write down or paste your custom header-footer snippet.
- Lastly, click on Save.

Note: The Header/ Footer Snippets are only displayed on the full site. You must get the pro version to show it in specific areas or web pages.
Show custom notifications
The Notification Bar module is very useful for prompting a message to website visitors. Adminify users can use this module to promote other products or show any kind of text.

To add your website notification, go to the Notification Bar from the WP Adminify section.
- In the General Settings, you can modify the Content Alignment, Display Position, Close button, etc.
- Write the text you want to show in the notification bar from the Content Section.
- Lastly, the Display Section allows you to manage on which page the notification popup will happen.
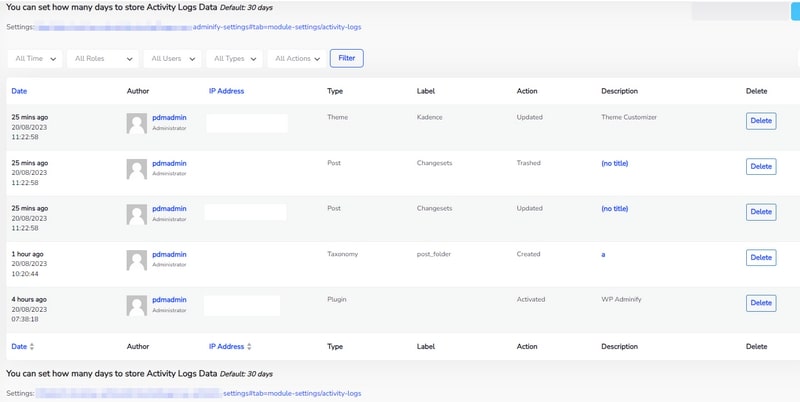
See the activity logs
The Activity Logs module is beneficial for security, and it displays all of your website’s activity logs without paying extra money. It is an excellent alternative to any other third-party activity log monitor plugin in the marketplace.
By simply clicking on the Activity Logs from the WP Adminify menu, you can view all of the activities of the websites for an extended period. You can observe all edits, posts, and changes by the roles of users. WP Adminify also has a powerful filter system to sort out actions, dates, types, IPs, and times.
How to enable/disable Adminify modules
WP Adminify provides a full dashboard to manage the modules. If you do not want any modules running in your WordPress dashboard, you can easily turn it off.

WP Adminify Pro features
The features and modules at the top were the most highlighting features we think are noteworthy to share. WP Adminify has a lot of customizing options that you can use to personalize your WordPress dashboard.
The pro version of WP Adminify includes all of the free features plus the following additional features:
- Automatic Dark Mode
- Change Logo for Light & Dark Mode
- Custom Sidebar
- Disable Comments
- Frontend Notification Bar
- Media Folders
- Multiple Dashboard UI Templates
- Post Duplicator
- Priority Support
- Scheduled Dark Mode
Adminify pricing: How much will it cost?
WP Adminify is a freemium WordPress plugin. Anyone can install it from the WordPress plugin repository by simply searching the name. However, users need a paid version of the plugin to use every module and other exciting customization features.
Let’s take a look at WP Adminify pricing.

Here is a table to get a better understanding:
| Name | Personal | Business | Agency | Enterprise |
| Price | $79 | $129 | $249 | Custom |
| Websites | 1 | 3 | 50 | |
| Updates / Support | 1 Year | 1 Year | 1 Year | |
| Multisite | No | Yes | Yes | |
| 3rd Party Plugin Compatibility | Yes | Yes | Yes |
You can also check their exclusive premium features on their website.
Final thoughts
In conclusion, WP Adminify is a feature-rich WordPress dashboard customizer plugin that offers various options to personalize your WordPress dashboard with ease.
If you seek to improve your WordPress dashboard’s customizability, usability, and whole appearance, WP Adminify is the tool you can choose. It’s relatively easy to use and provides a wide range of personalization options. If you have any questions, feel free to write us below. Happy customizing!
Disclaimer: This post may contain affiliate links and we may receive a small commission if you purchase something by following them. However, we recommend services/products that we believe good to serve your purpose.


