How to Create LearnDash Live Class Using Zoom (6 Easy Steps)

Are you looking for how to create a LearnDash live class? Many course instructors want to conduct live classes with LearnDash. Live online lessons enable you to interact with your students directly and also integrate your courses with webinars.
There are several streaming platforms you can use to conduct a LearnDash live class. In this post, we’ll show how to use Zoom to create a live online class with LearnDash. This will help you understand how you can connect your online courses with Zoom and create LearnDash live classes. We’ll be using the free version of Zoom, which is great if you’re just starting out. Although, a paid Zoom account is recommended if you want to expand the live classes.
What features do you need for a live online class?
LearnDash is one of the best WordPress LMS plugins today. It provides you with all the features you need to create the perfect eLearning site. Whether you want to create a basic online education website or a multi-instructor online course marketplace, LearnDash has everything you need. Taking live online classes is also an important feature for eLearning sites today.
When you’re creating a live online class, you need to make sure it has all the features you want. For example, if you have a large number of students, you have to ensure that your meeting hosting platform supports that number of students for a live session. This mainly depends on which platform you choose.
There are many platforms that give you enough features in the free version, which is sufficient if you’re starting out. In the Zoom free plan, you can have 100 attendees, Whiteboard Basic, team chat, and other features. But if you upgrade to a Zoom paid plan, you’ll have access to AI Companion, cloud storage (5GB), and essential apps.
Therefore, before you choose a platform, make sure it provides you with the necessary features. Some of the features that are essential for your LearnDash live class are as follows:
Number of attendees
The first thing that we think important is the number of attendees. If you have a large number of attendees, then make sure that the platform you’re opting for can accommodate that. The free version of many platforms can support a good number of attendees. Zoom actually allows 100 attendees in its free version, so if you have less than or equal to 100 students, you’ll be good to go with the free version of Zoom.
Zoom also gives you access to Notes in the free plan. This is a dedicated, built-in note-taking app that allows your students to take notes from your live class.
Session duration
One of the most important things that you need to ensure is the session duration. If you’re using the free version of a platform, you might not be able to take longer classes. Right now, the free version of Zoom allows only 40 minutes of session duration. If that’s fine for you, you can go with the free plan, otherwise, you need to upgrade to a paid plan or choose another platform.
Multiple presenters
If you have a multi-instructor course, then this is a feature that you might want. When there are multiple instructors for a course, it is essential to include multiple presenters. So if you have a longer session, you can allow more presenters when other presenters can take a break.
Screen sharing
Screen sharing is a very common practice in online live classes. This gives you the ability to share your computer screen with your attendees. Today, many platforms provide additional features for screen sharing, such as drawing tools that allow you to highlight parts of your screen.
So if you’re taking a course where you need to share your computer or mobile screen, this is something that you need.
Screen recording
Screen recording is also a common feature on many platforms. It is useful if you want to keep a record of your live sessions. But on some of the platforms, this is a premium feature. So if screen recording is something that you need, ensure that you’re getting this feature from your platform.
Although there might be other ways through which you can record your live classes, the quality of the audio and video might not be as good as you might expect. So it’s best to ensure the conference platform you’re using provides you with screen recording features.
Reporting
Many webinar platforms provide you with a reporting feature. This allows you to know how many attendees took part in the class, if anyone left the class before the class finished, how many students asked questions (raised hand), and other information. Reporting tools help you get insights into how successful your live classes are. It will also help improve your future classes.
These are some of the features you might want in your LearnDash live classes. Of course, various platforms provide more features. It would be really great if you first made a list of features you wanted in your live classes. In this way, when you choose your live webinar platform, you can compare the features with your list to ensure you’re getting everything you wish for.
Again, when you want to take your online live classes to the next level, it would be best to check if the paid plans of your platform provide you with more useful features.
👉 Get LearnDash NOW!
🔥 Use LearnDash Coupon Code WPGIZ10 for Discount!
Some popular live online streaming platforms
There are several online live streaming platforms that allow you to host your LearnDash live classes. You can choose from any popular platform. LearnDash integrates well with most of the popular live webinar platforms, so you don’t need to worry about compatibility.
Starting with the free plan of a platform is fine because most of the popular platforms allow 100 attendees. But the number of attendees isn’t everything. You should also check out the presentation quality on that platform. So check everything before starting your LearnDash live class. Here are some online live meeting platforms that you can choose from.
Zoom
Zoom is one of the most popular video conferencing platforms that offers cloud video conferencing, online meetings, and group chat on one easy-to-use platform. You can use it to connect with your students, colleagues or friends remotely and conduct virtual meetings, webinars, and events.
Zoom also integrates well with LearnDash. Using Zoom, you can arrange your online live classes. You can also use the free version of the platform to conduct LearnDash live classes. Keep in mind, that Zoom allows only 40 minutes for each session in the free version.
Join.me
Join.me is a cloud-hosted application that facilitates online meetings and video conferencing. Whether you’re a business professional or an individual, Join.me allows you to connect with others remotely, collaborate, and share ideas.
Join.me is very simple and contains only the most useful features. It has screen sharing, presenter swap, and whiteboard tools. It does lack some advanced features, but if you need simplicity in your online classes, then it doesn’t get any simpler than Join.me.
GoToWebinar
GoToWebinar is a platform that enables online seminars and virtual conferences. GoToWebinar is another product of GoToMeeting. The platform offers advanced features that you can use to conduct your online live classes. If you have to do multiple webinars a day with hundreds of attendees, then GoToWebinar might be a suitable platform for you.
Adobe Connect
Adobe Connect gives you complete control over your virtual sessions, allowing you to create stunning, custom experiences. Whether it’s a training session, webinar, or meeting, you can tailor the environment to your needs. It’s commonly used for engaging training and learning sessions, highly customized webinars, and reliable, high-quality meetings.
Like other products from Adobe, it takes a bit of time and practice to learn how to use the platform. But once you get the hang of it, you’ll be able to perform online live classes with the best settings.
How to create LearnDash live class with Zoom
You can choose your favorite live video conferencing platform for your online classes. For our tutorial, we’re going to use Zoom, as it provides us with all the necessary features for a basic live online class. Also, it’s really easy to set up and get started with.
We’ll assume that you already have LearnDash up and running on your website. If not, you can download LearnDash from the link below. Besides LearnDash, we’re going to need an extra plugin to connect LearnDash with our Zoom account.
👉 Get LearnDash NOW!
🔥 Use LearnDash Coupon Code WPGIZ10 for Discount!
Step 1: Install the Video Conferencing with Zoom plugin
Since we’re going to use Zoom to stream the class live, so we need to have a Zoom account. We’re also going to install a plugin called “Video Conferencing with Zoom” on our LearnDash LMS site. The plugin has over 20,000 active installations.

Once the plugin has been installed and activated, you’ll see a new option called “Zoom Events” added to your admin dashboard.
Step 2: Create a Zoom app
In one of our previous posts, we explained how to create live online classes with Tutor LMS using Zoom. We also have a video on this topic on our WPGIZ YouTube channel. So if you want, you can watch that too.
But don’t worry, we’ll cover the steps in this post as well. First, sign in to your Zoom account and visit the Zoom app marketplace located under Admin > Advanced.

From here, hover your mouse over “Develop” (located on the top right corner of the screen) drop down and click on “Build App”. From the app type find “Server-to-Server OAuth” and click on the “Create” button.

Then you’ll be asked to name your app. Give it a relevant name, such as LearnDash Live Class.
Step 3: Set up Zoom app
Once you’ve named your server-to-server OAuth app, you will be taken to the app setup screen. On the first screen, you’ll see the credentials for the app. This will contain your account ID, client ID, and client secret key. We’ll look at this later on, for now, let’s proceed to the next step.
Click on the “Continue” button to proceed to the Information tab. Here, you can edit the basic information of your app. You can change your app name, provide a short description, set the company name, developer name, and email address. Once you’re done with this step, click on the “Continue” button to proceed to the next step.
In the “Feature” tab, you’ll see your app’s secret and verification tokens. Click on the “Continue” button to move to the Scopes tab. Here, you can add all the necessary scopes you need. Just click on the “Add Scopes” button to add your necessary scopes.

We selected all the scopes from Meeting, Webinar, Recording, and User. But it’s up to you which scopes you want for your LearnDash live class. Click on “Done” and then “Continue” to proceed to the final step. Now, if everything is okay, you can click on the “Activate your app” button to activate your app.

Step 4: Connect your Zoom app with your LearnDash site
Remember the credentials and feature tabs? We need to copy these information and paste into our Zoom Events settings. This will connect our Zoom app with our LearnDash site.

So let’s go back to LearnDash admin dashboard, and click on the Zoom Events option. Now paste the credentials into the relative fields.

For client ID and client secret, you can use the same credentials. Once you’re done, click on the “Save” button. If everything is okay, then you should see a notification on your WordPress dashboard saying “Credentials successfully verified and saved”.

Now you can click on “Verify SDK Credentials” and check if your Zoom online meeting is working. If it is, you should see the virtual meeting on your WordPress site. Once the verification is complete, you’re ready to create online classes for your LearnDash courses. Now you should see more options on your Zoom Events. If you don’t see it, just refresh your page.
You can also click the “Settings” tab to check out some online class settings. There will be options such as meeting deletions, enable/disable counters, show zoom author, show past join link, etc. Right now, it’s not essential, so we’re skipping this part.
👉 Get LearnDash NOW!
🔥 Use LearnDash Coupon Code WPGIZ10 for Discount!
Step 5: Create a Zoom meeting
Before adding our live class to any lessons, we need to first create a meeting. From your WordPress dashboard, go to Zoom Events > Add New. Give your meeting a name and description. Below that, you can find several meeting options.
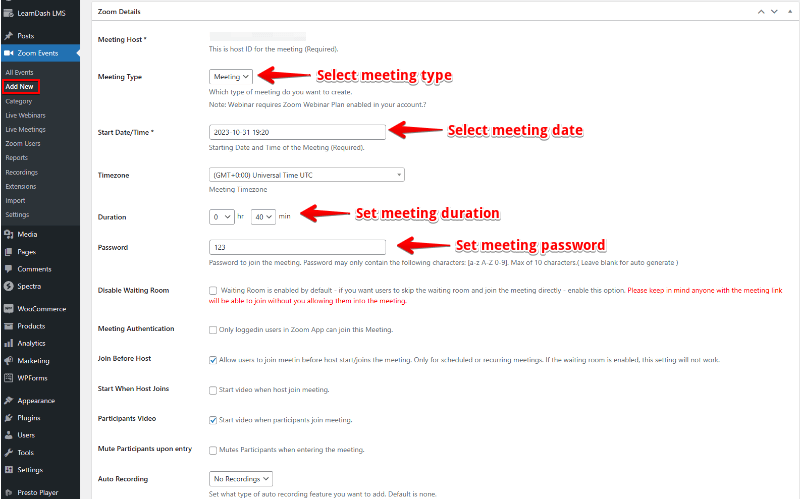
Select the meeting author, meeting type, start time, duration, password, and look at other options. After you’re done, click on the “Publish” button to create the online class.
Step 6: Add the Zoom meeting to your lesson
Now that we have created our online meeting, we need to add this to one of our lessons. We’re going to do this by using the Zoom online live class block. First, create a course with LearnDash, then add some lessons to the course. Open up the lesson builder and click on the + icon to open up the Gutenberg blocks.

There are several ways to display your online live class. We’re going to choose the “Zoom – Join via Browser” method so that students can join the live class through their browsers. After you add this block, you need to provide the following:
- Passcode: You can provide the passcode of your meeting so that students can join automatically without entering a passcode.
- Select meeting type: Select if you want it to be a meeting or a webinar.
- Select a host: Select host of the live class.
- Select meeting: Select your meeting from the list.

After you’re done providing the important details, click on the “Save” button to create your LearnDash live class. Once that is done, you can view the lesson and see the online live meeting on the frontend.

By clicking on “Join via Browser”, students can start their LearnDash live class. And from your Zoom account, you can go live at the given time.
So that is how you can use Zoom to conduct LearnDash live classes online. All you need to do is create a Zoom account, then create a Zoom app, configure the app, copy and paste the credentials to your Zoom event plugin, and connect your Zoom app with your LearnDash site. Finally, create your meetings and connect them to your LearnDash lessons. It’s so simple!
👉 Get LearnDash NOW!
🔥 Use LearnDash Coupon Code WPGIZ10 for Discount!
👉 Also Watch: How to Do LearnDash Live Class with Zoom
Conclusion
That brings our tutorial to an end. We hope you’ve fully understood how to create LearnDash live classes with Zoom. If you’re conducting online live classes for the first time, we recommend first testing your online classes. Create a meeting and ask someone to join the meeting. Once you see everything is working properly, you’re ready for the real live class.
You should also create your slides and check if everything is working. A good idea would be to create a demo online live class and ask some students to join in. Once you’re satisfied with the demo class, you can then be ready for the real deal.
It takes time to master the online live classes but once you have the hang of it, you can easily create and conduct live classes like a pro!
Disclaimer: This post may contain affiliate links and we may receive a small commission if you purchase something by following them. However, we recommend services/products that we believe good to serve your purpose.


