LearnDash Review 2026 – The Leading WordPress LMS Plugin

If you are in the LMS industry, the chances are, you’ve heard about LearnDash. It’s one of the most popular LMS plugins for WordPress. Many leading brands and individuals use LearnDash to create professional LMS websites. In this post, we are doing a LearnDash review for 2026.
If you are not familiar with the term LMS, then let us first understand what is LMS plugin. LMS stands for Learning Management System. Using this technology, you can build an online course marketplace for individuals or multi-instructors. This software allows you to create and publish courses online. You can also monetize your courses with them. Now what is WordPress LMS? It’s simply an LMS plugin for WordPress.
Creating LMS websites was very complicated before. But now, because of WordPress and some amazing plugins like LearnDash, you can create an entire LMS website on your own. Because of these amazing WordPress LMS plugins, you can now create your LMS website without coding.
In this review, we are going to take a deeper look at LearnDash. We wrote about LearnDash in some of our previous articles, but since then, LearnDash has received some amazing updates. There are several LearnDash reviews out there and we also reviewed some of the top LMS plugins. Therefore it’s only fair that we review LearnDash as well. So, let’s start the LearnDash review post!
Some quick words about LearnDash
First, let’s discuss what is LearnDash. It is a WordPress LMS plugin by LearnDash. LearnDash was built by experts in the eLearning industry. Many universities and educational institutions prefer it. The plugin was created to give everyone simplified solutions to complex problems when building an LMS website.
If you haven’t used LearnDash yet, then I would like to state some of the features and functionalities of the plugin to get you started. This introduction will help you get up to speed. Although listing each and every single feature of an LMS plugin could take the whole day. For that reason, I want to include some of the most important features.
If you’re Google “best LMS plugin for WordPress”, it is very likely you’ll find LearnDash on top. Since LearnDash has a massive feature list, let’s divide the features into 2 groups. The course creation and the course management.
👉 Get LearnDash at Discount! ✂️
🎉 Use coupon code WPGIZ10 for exclusive Deal! 🔥
Course creation features
Creating courses with LearnDash is easy and fun. When you start creating a course, you’ll be surprised by how thorough the plugin is. The LearnDash course builder gives you the following features:
- Lessons and topics for your course
- Video contents
- Visual course builder
- Quizzes with multiple categories
- Assignments
- Q&A form
- Lesson timer
- Content drip system
- Course prerequisites
- Certificate, badges, and also a certificate builder
All these features help you create an amazing course. It would be best if you plan out your course curriculum and quizzes. Then creating an entire course won’t take much time.
Course management features
You can create and publish rich courses using LearnDash, that’s all fine. But what about the management options? Well, LearnDash gives you settings, reports, and statistics options that you can use to observe your course progress. For course management, LearnDash gives you the following options:
- Detailed reports
- Course stats
- Create groups and assign special users to manage each group
- Automatic LearnDash email notifications that are triggered on user activities
If you connect Zapier with your LearnDash LMS plugin, you’ll get more automation functionalities. If you want better reports and analytics, you can purchase the LearnDash ProPanel plugin which gives you even more detailed reports. It generates better insights for your LearnDash activities and helps you manage your LMS site in a more efficient manner.
You can monetize your courses using native payment integrations with PayPal. You can also use third-party eCommerce tools or membership plugins to sell your courses.
Who uses LearnDash?
LearnDash is a popular WordPress LMS plugin and it offers powerful LMS features. The plugin is used by many universities and educational organizations. It’s also used by smaller websites and single instructors. The following universities/institutions use LearnDash for their eLearning website (including but not limited to):
- The University of Florida
- The University of Michigan
- Infusionsoft
- WP Elevation
- Mindful Life
There are many organizations that prefer using WP LearnDash. And once you see how easy it is to create and sell courses online, you’ll love LearnDash. So we want to get some hands-on experiences on LearnDash and find out what are some of the features that make LearnDash so amazing to use. For our LearnDash review, we will also see what are some of the new features as well. If you want to know how to use LearnDash in WordPress, we’re going to explain that too.
Exploring LearnDash
Of course, you can’t write a LearnDash review without actually using it. So now I will install LearnDash LMS plugin for WordPress and use it to create a course. We will also take a look at some of the other features like LearnDash course builder, quiz builder, email notifications, advanced settings, etc.
However, do remember that this is not a tutorial but a LearnDash review. We will see how you can create a course, add topics and lessons to it, add quizzes, and discuss various features of LearnDash. The purpose of this LearnDash WP review is to give you an idea of how LearnDash works and see some of its features in action.
It might be a good idea to compare LearnDash with another LMS plugin to actually see the special features of LearnDash. We did a piece on LearnDash vs Tutor LMS but since then, both of the plugins have received significant updates. So that might not give you the full idea right now. But that will give you an idea of how these 2 giants approach solving the LMS challenges.
LearnDash installation and the setup wizard
So if you’re using WordPress for a while you know the drill. You need to set up your WordPress website first. Get a domain & hosting or set it up on your local server, then install LearnDash. If you are wondering how to install LearnDash, then let us quickly explain. You have to first purchase the plugin from the official LearnDash website. Then download the compressed file and save it on your computer. Then from your WordPress dashboard go to Plugins > Add New then select Upload. Then upload your compressed file and click on Install.
As soon as you install LearnDash you will be greeted with a welcome page followed by the setup wizard.

You can skip the setup process but you have to go through the settings manually afterward. So, why not take the auto setup? Clicking on the “Get Started” button starts the setup process. The first thing you have to do is insert your email address and your LearnDash license key.

Once you insert your email address and LearnDash license key, click on the “Validate” button. If everything is alright, then you’ll see a green text below the license input box saying that validation was successful.

After that, the setup wizard asks you about what kind of courses you want to make. The first option lets you choose “Just One” or “Multiple”. If you just decide to sell one course, then you can select “Just One” or if you want to create a marketplace, select “Multiple”.
Next, it gives you several options to choose from. Depending on what options you choose, LearnDash will install the appropriate plugins for you.

Of course, we want to sell our courses online. You can either use Stripe or select WooCommerce. If you decide to go with Stripe, simply hit connect or if you want to go with LearnDash WooCommerce plugin, LearnDash will install the WooCommerce plugin for you.

If you’ve selected WooCommerce, the WooCommerce setup will launch after your LearnDash setup is complete. In the end, the setup wizard shows you a summary of the setup. If you want to change anything, you can go back and change it. Don’t worry about these settings, because you can manually access these as well.
So after the setup is complete, your LearnDash LMS plugin will be ready to use on your WordPress dashboard.

Right after you install LearnDash, you’ll see a message on the side guiding you to the mini-bootcamp. The LearnDash BootCamp is there to help you understand how the plugin works. You can go to the bootcamp page and watch the video tutorials to get a general overview of LearnDash.
There are 10 tutorials that teach you about course creation, adding content such as lessons & topics, creating quizzes, setting up and registration, and much more. These tutorials are also available on the relevant options. For example, if you click on courses, you’ll find the “Creating a course with LearnDash” tutorial from BootCamp.
👉 Get LearnDash at Discount! ✂️
🎉 Use coupon code WPGIZ10 for exclusive Deal! 🔥
Let’s setup our theme
Ok, so what about themes and other integrations? We will use the Astra theme because some people say it is the best theme for LearnDash. In fact, if you look at the starter themes of LearnDash, you’ll see that Astra and Kadence themes are recommended by LearnDash. LearnDash Astra theme is very popular among users.

You can also search for “LearnDash” when you are looking for themes, and there’ll be lots of LearnDash themes suggested to you. But Astra offers 180+ starter templates and you can import any templates. LearnDash Astra templates are well designed and you just have to install the importer plugin.

There are several Astra LearnDash themes as well. You can choose the one you like. We imported LearnDash Academy, an Astra LearnDash LMS starter site. There are so many LMS or education-based themes available. You can go ahead and pick one.
You can also check out our post on the best themes for LearnDash.
Creating a course with LearnDash
We have everything set up, now let’s create a course with the LearnDash LMS plugin. There are several LearnDash course reviews out there, but we mainly want to check out the LearnDash course-building experience. For demonstration, we are going to develop a course for WordPress. From your WordPress dashboard go to LearnDash > Courses.

If you’ve imported a good theme, you might see some demo courses here. In our case, we have 3 demo courses. If you hover your mouse over these courses, you’ll see options to edit, view, delete, clone, build, etc. options. From here you can click on the “Clone” to use the LearnDash clone course feature. But we want to create our very own course. Se we are clicking on the “Add New” button on top which takes us to the course creation page.

As soon as you enter the course creation, you’ll see the course content area where you can put your course title and descriptions. It will be very familiar as this is the WordPress editor. There is a navigation tab on top where you can cycle between the course page, builder, and course settings.
The course page mainly consists of the course description and overview. If you want to add lessons and topics, click on the builder. For adjusting the settings of the course, you can do that from the settings tab. We will look at each of these tabs starting from the settings tab. If you’re looking for a LearnDash tutorial, we also have helpful videos on our YouTube channel you can check out.
👉 Video: How to create a course using LearnDash
Course settings
In the settings tab, you’ll have access to various course-related settings. The first option is the course access settings. It controls how users access your course. You can customize the following options here:
In the settings tab, you’ll have access to various course-related settings. The first option is the course access settings. It controls how users access your course. You can customize the following options here:
- Access Mode: This option lets you decide if you want to make it a paid or free course. There are several payment settings for a paid course. You can choose “Buy now” and put in your course price and course enrollment URL.
You can also choose “Recurring” if you want to create a course that students must pay for on a monthly or weekly basis. You can set the billing cycle here. You can also sell a trial course that expires at your defined timeline.

Generally, this is the standard method if you want to make paid courses. However, make sure to setup your payment method. LearnDash LMS plugin has built-in PayPal and Stripe. You can also install WooCommerce to sell your courses. For that, you need an extra addon from LearnDash.
Since we want to sell a course, we are selecting the “Buy Now” option.
- Course Prerequisites: This option lets you choose which courses the students must complete in order to enroll in this course. For our example course, we don’t want a prerequisite. So we are not going to enable this option.

- Course points: You can create a point system for your LMS website. For completing certain actions like completing a course, you can award them with points. You can also set a required amount of points that they need in order to enroll in this course.
We want to create a simple course so we don’t want this feature. So we are not going to enable it.
- Course Access Expiration: You can set a definite time period after which the course will expire and students can no longer access this course.
The next portion is the course display and content options. In this section, you get the following options:
- Course Material: If you enable this option it will bring up a WordPress editor. Here you can write what LearnDash course materials will be included in this course. This looks great and we are going to include some text here and check out later how it looks.
- Course Certificate: This is the dropdown box that lets you choose a certificate that you built. For now, it’s empty because we haven’t created any certificate. But LearnDash introduced a certificate builder in March 2020, that you can download for free. Using this builder you can create and customize certificates. However, this certificate builder is only compatible with LearnDash
- Challenge Exams The LearnDash Challenge Exams is a new feature that was introduced in LearnDash 4.0. It lets the user skip ahead of a course by answering a set of questions prior to the course. You can of course create multiple sets of questions from the “Challenge Exam” option on your WordPress dashboard.

Then to add the LearnDash challenge exams, you can do it from the settings option. This is a great new addition to LearnDash WordPress plugin but we won’t use it right now.
- Course Content: You may choose to view course content from this option.
- Custom Pagination: You may choose your own custom pagination system and select how many lessons and topics will be displayed per page.
The next settings option is the Course Navigation Settings where you can choose your course progression system. You may choose:
- Linear: If you select this option then the user must go through a course sequentially.
- Free form: If you select this option then the user can freely move through the course in any order they want. There is no sequence.
By default, Linear is selected and I prefer this option as well.
👉 Get LearnDash at Discount! ✂️
🎉 Use coupon code WPGIZ10 for exclusive Deal! 🔥
Course page
Now let’s get back to our course page and name our course. We are naming our course “WordPress Masterclass”. In the content section, you can also add some descriptions to your course.

In the description, you can add details regarding what the course is about, what the students will be learning, who is this course for, etc. So we added our course title and description, now let’s move on to the course builder.
Builder

Now, this is the important part where you can add topics and lessons to your course. Once you open the builder, you’ll see it is divided into 3 parts, lessons, topics, and quizzes. So you start by creating a lesson and then, add one or more topics to that lesson. Let’s see how this works.
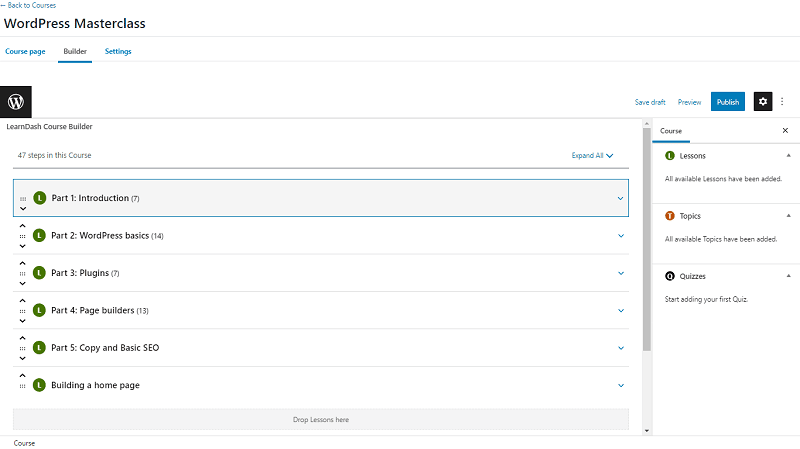
So we added multiple lessons to our course by simply clicking on the “New Lesson” button. You can also rearrange these lessons using the up & down arrows beside each lesson. It is also possible to drag and drop. You just need to click and hold the dots (𓃎) between the two arrows.
In this way, you can add as many lessons to your course as you want. Ok, so we have lessons now, what about topics? To add a topic, you need to click on the down arrow (˅) and you can see the option to add a topic and quiz. Click on the “New Topic” button and then give your topic a name.

In this way, you can add multiple topics to your lessons. Once you are done, expand another lesson in which you want to add more topics. Then following the same process keep adding topics. The number of topics in a lesson is indicated by a bracket at the end of the lesson name.
👉 How to Create a Course in LearnDash
Alternate way for adding lessons: From your WordPress dashboard go to the lesson option and click on “Add New”. This will open up the WordPress block editing screen that you’ve seen on the course creation page.

From here you can give your lesson a name, and add texts and images to your lesson. But after you’re done, click on “Publish” to save your lesson.

Now go back to your builder and on the right side of your screen, we can see the lesson that we just created. If you’re wondering why only one lesson is here, then don’t worry. This section only has the lessons that aren’t added to this course. You can check to mark the lesson and click on the “Add” button to add it to a course. you can also drag and drop the lesson on the course list as well.

We have all the topics and lessons but what about lesson contents? Topic contents are the main contents as students will be going through these topics in order to complete a lesson.
You can edit your topics just like lessons. You can go to LearnDash > Topics from your WordPress dashboard and you’ll see all the topics that you created. You can hover your mouse over any of these topics and click on edit to add content to it. This will bring up the WordPress block editing screen.

Alternatively, you can also access this screen from the builder. Besides the lesson, click on the Edit button on the right side to go to the topic editing screen.

You can use any method you are comfortable with. So, after opening up the topic builder, you can give a title and description, but we want to add videos. To add a video, click on the “Settings” tab right next to “Topic Page”.

On this page, you’ll find various options:
- Topic Materials: If you want to add materials to your topic such as PDF files, infographic images, etc. you just need to enable this button. Next, you can include your files using the WordPress block editor.
- Video Progression: Here you can input the URL, iFrame, or shortcode for a video. It can be from YouTube, Vimeo, etc. You can also select one of the two display timings. If you’re facing a problem where the LearnDash video progression not working, then check out the documentation for support.
- Autostart: If this option is enabled, the video will start automatically as soon as the page loads.
- Video Control Display: Enable this option to make the controls of the video visible so the students can pause, forward, and rewind the video.
- Video Paused on Windows Unfocused: If this option is enabled, the video will be paused when the user switches to another tab of their browser.
- Video Resume: If you enable this option, the video resumes from the exact spot where the student left it last time. This uses cookies.
- Assignment Uploads: Enabling this will allow your students to upload their assignment files to this particular topic. You can also enable assignments for a full lesson. To enable this option you must enable the Topic Timer option and the LearnDash Video Progression option.
- Topic Timer: Enabling this option activates a timer chosen by you. Until this timer expires, the topic cannot be marked as complete. However, since this option contradicts the LearnDash video progression and assignment options, you cannot enable this while one or both of those options are enabled.
Of course, there are other options to explore, but we just want to add the URL of our YouTube LearnDash video. You can also upload videos from your computer to your LearnDash topics. So using this setting we are going to add videos to our topics.
Now before adding quizzes we want to check how our course looks. So we are going to click on “Publish” and then take a look at our course.

Astra has already added our course on the front page. Just click on it and you can see how the course looks. As you can see, the title of the course appears on the top followed by the description of the course. If you scroll down, you can also see the course lessons and the topics within them. This is displayed as a part of the course contents so that students can see what they’ll be learning. You can disable this option but we have kept it for demonstration purposes.

Just click on the “Expand” button and you can see the topics we created.
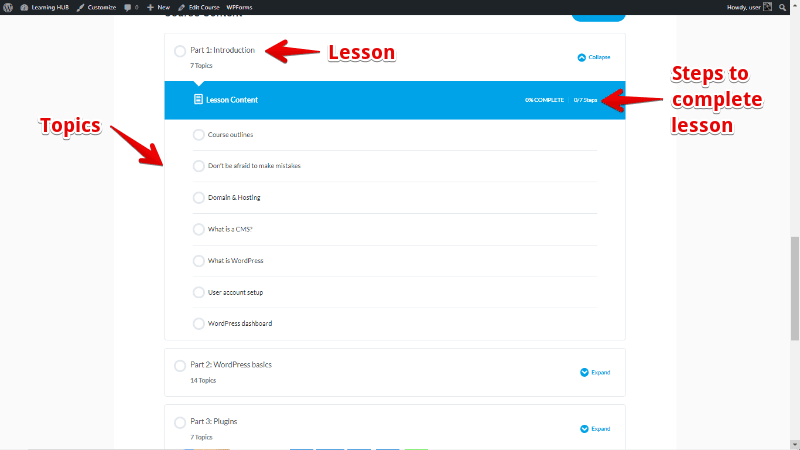
Let’s click on a topic and see how it looks.

This is what the course overview looks like. However, if a student enrolls in a course, the course page will be different. You can try to enroll in a course and check out how it looks from a user’s perspective.
You can also enable the “Focus Mode” that changes the design of the course page. It also hides the header and footer so that students can concentrate on the lessons more. Here is a screenshot from LearnDash’s documentation to give you an idea of what the focus mode really looks like.

Adding Questions
Now let’s add quizzes to our course. To add questions, you can follow the same method as you did for topics and lessons. You can access questions from your WordPress dashboard and create quizzes from there. You can create quizzes for your topics or you can create quizzes for each lesson.

Let’s create some quizzes for our lessons and topics. From the WordPress dashboard go to LearnDash > Quizzes and click on Add New which will take you to another page that looks similar to the course builder. From here, we are giving our quiz a title and a description, then we’re moving on to the builder.
From here we’re clicking on the “New Question” button to create our quiz. Once the question is created, a red warning mark appears letting us know that there are some issues with our question. Well obviously, since we haven’t written our quiz or selected our quiz category.
So let’s select our quiz category first. From the dropdown on the right, we can see that there are 8 quiz categories. These are
- Single choice
- Multiple choice
- Free choice
- “Sorting” choice
- “Matrix sorting” choice
- Fill in the blanks
- Assessment
- Essay/Open Answer
We are going to select a single choice because we want to create a simple quiz. So after selecting the category, write your quiz, and add some options to your single-choice quiz. You can drag and drop the quiz options to rearrange their order.
After that, select the correct answer. You can also assign how many points will be awarded to the student upon answering the quiz.

After you finish, you can click on publish, or you can click on the “Settings” tab and connect this quiz to your lesson or topic.

Like this, you can create multiple quizzes and then connect those to your lessons or topics. Alternatively, you can just create multiple quizzes and then go to your LearnDash quiz builder, and from there, drag and drop your quizzes to your relevant lessons or topics.

You can also create a group of questions and name those as topic final or course final quiz. Then add those in the “Final Quizzes” section to create a final quiz.
👉 Get LearnDash at Discount! ✂️
🎉 Use coupon code WPGIZ10 for exclusive Deal! 🔥
Some cool features of LearnDash
While exploring LearnDash, we found some really cool features that are worth mentioning. While all the LMS plugins have a similar process of creating courses, managing those courses is something that shouldn’t be overlooked.
The Visual Course Builder
We used the visual course builder when creating our course. The LearnDash front-end course creation allows you to see how many topics your course has and you can add lessons and quizzes to your topics. You can also drag and drop these elements to re-organize them in any order you wish.
If you have your lessons and quizzes ready, you can simply come to the LearnDash course builder and then easily connect all of these with the course. You see how easy LearnDash course creation is?
Course create wizard
When talking about the cool features of LearnDash, it is essential to mention the Course create wizard. This is truly an innovative and unique feature of LearnDash. This feature allows you to enter a URL of a YouTube playlist, a Vimeo Showcase, or a Wista Project and create a course easily. To access this feature, simply go to LearnDash > Courses from your WordPress dashboard. Then click on the “Create from Video Playlist” button.

Then you’ll find an input box to paste in your playlist URL. Just simply copy and paste your YouTube, Vimeo, or Wista playlist and click on the “Load the playlist data” button and watch the magic happen.

Remember, you can only use the URL of:
- A YouTube Playlist
- A Vimeo showcase
- A Wista Project
Just keep in mind that you need to put in the URL of the playlist and not an individual video from the playlist.
The Course create wizard automatically loads all the data of the playlist and creates the course lessons corresponding to each of the videos in the playlist. From there, you’ll be presented with the course access settings page that we’ve discussed before.
This is truly an amazing feature. Create your YouTube, Vimeo, or Wistra playlist and put in the URL in LearnDash to quickly create a course.
Course navigation settings
You can also choose how users can navigate through your course from the course settings page. You can choose Linear or Free Form. If you choose linear, users can progress through the course in the designated step sequence.
If you choose Free Form, users can navigate through the course without following the designated step sequence.

Video progression system
If you choose to add videos to your course contents, then the LearnDash video progression system will allow you to add self-hosted or external videos (from YouTube, Vimeo, etc.). We discussed this feature when we were building our course.

You can also tweak the settings so that students must watch the whole video before they can mark the lesson as complete. You can attach a time limit, until that time limit is reached the video lesson cannot be completed. You can also use Presto Video alternatively. Although we haven’t discussed Presto as you can already see there are so many options to explore. You can go through each of these settings to get a better understanding of your course builder.
Unique Notification Triggers
The LearnDash email notifications is also an awesome feature. You can set the email notification triggers. From your LearnDash settings, go to the Emails tab and you can set the triggers for your emails.

You can also click on manage to edit the emails that will be automatically sent to your users when the respective action is triggered.
LearnDash Addons
You can add extra functionalities to your LMS site by using extra LearnDash addons. In general, LearnDash provides you with the optimum features and settings that are essential for creating an LMS website. But if you feel that it’s not enough, you can look for more addons from LearnDash > Add-ons.

This is a collection of some of the best LearnDash plugins or addons. You can also use third-party add-ons as well because LearnDash has good compatibility with other plugins.
LearnDash ProPanel
Another amazing thing that we must discuss is LearnDash ProPanel. Some might call it the LearnDash dashboard plugin as it sits on your WordPress dashboard. But it’s actually called LearnDash ProPanel.
We mentioned in the beginning about the LearnDash LMS – ProPanel. It helps you get all the important data and statistics regarding your LMS website. It helps you manage and view your LearnDash activities from a new dashboard.

After you install and activate LearnDash ProPanel, go to your WordPress dashboard. You will find the LearnDash ProPanel widget along with other WordPress notifications (if you have those enabled). This plugin serves as a LearnDash notification and keeps you informed about your LMS LearnDash website.
Since we just created our LMS website for demonstration purposes, we don’t have much going on here, but once your site is live and running, you’ll see all the activities from this single panel. You can also click on these elements for more detailed reports. For example, if you click on Total Students, it will show you all your students. From there you can also click on a particular student to see which course that student enrolled to. You can also see the student’s LearnDash quiz statistics.
Although to use ProPanel, you have to purchase it separately if you’ve purchased the regular LearnDash WordPress plugin. If you purchase any of the LearnDash cloud plans, the ProPanel will be included with it. The LearnDash ProPanel has the following plans:
- For 1 Site – $49/year
- For 10 Sites – $99/year
- For Unlimited Sites – $199/year

Next, we will finally talk about LearnDash WordPress plugin pricing.
👉 Get LearnDash at Discount! ✂️
🎉 Use coupon code WPGIZ10 for exclusive Deal! 🔥
LearnDash Pricing
It’s now time to find out how much LearnDash cost. LearnDash has updated the pricing plans and the LearnDash cloud was also introduced on the pricing page. Although LMS plugins are normally costly since these plugins are very feature-rich. Well, the good news is, that LearnDash is comparatively far cheaper than other SaaS alternatives. But there is no free LearnDash plugin for WordPress.
Previously there were 3 plans for the base plugin, the Basic, Plus, and the Pro plan. The 3 plans are still there but have updated pricing. It’s no longer called the Basic, Plug, and Pro plans. It simply states the number of licenses you wanna purchase LearnDash for. So the normal LearnDash plugin has the following plans:
- 1 Site – $199/year
- 10 Sites – $399/year
- Unlimited Sites – $799/year

If you want a LearnDash lifetime license, unfortunately, it’s not available. Previously the Propanel LearnDash was available with the Plus and Pro plans. Now you have to purchase the plugin separately. If you purchase the LearnDash cloud plan, the Propanel will be included with it. LearnDash cloud has 2 plans:
- Monthly – $29 per month
- Annual – $24 per month

As you can see it also includes LearnDash-Propanel which is a $49 plugin. So if you want a managed WordPress LearnDash site, you can pick one of the LearnDash cloud plans. Unfortunately, there is no LearnDash lifetime deal, but you can purchase a LearnDash license for unlimited sites. There are many LearnDash alternatives WordPress plugins you might wanna check out that offer WordPress LMS plugin lifetime deals.
You can also check out our article on “How much does it cost to create an LMS website” to get a better idea of the cost of creating an LMS website. If you’re looking for an LMS plugin for WordPress, you can check out blog for more posts. We have reviews on the best lms plugins for WordPress. If you’re facing difficulty, there are many LearnDash experts in the community and you can ask for support.
👉 Get LearnDash at Discount! ✂️
🎉 Use coupon code WPGIZ10 for exclusive Deal! 🔥
Conclusion
So that wraps up our LearnDash review 2026. LearnDash WordPress gives you many features at your fingertips so you can create the perfect LMS website you dream of. Although we haven’t used any extra plugins in our demonstration, you can use those extra plugins if you want. You can use Elementor, and other plugins as well.
Combining LearnDash with the right theme, you can create an amazing LMS website. So go ahead, and give LearnDash a try, I’m sure you won’t be disappointed. There’s a reason why LearnDash has been considered one of the top LMS plugins in the market and through our demonstration, we can see why. It’s easy to use and you can build engaging courses.
So what’s your thought on LearnDash and what do you think about our LearnDash review for 2026? Let us know your thoughts in the comment section below!
Disclaimer: This post may contain affiliate links and we may receive a small commission if you purchase something by following them. However, we recommend services/products that we believe good to serve your purpose.


